
This Pâte Sablée or Classic Sweet Tart Pastry is a basic recipe that everyone needs in their repertoire. Making a tart dough in a pâte sablée style is not that easy but it’s not hard either. Once you get the hang of it you’ll want to make it over and over again. It’s delicious, and sweet and has a lovely cookie texture. My favourite! “sablée” is a French word that means crumbly. That’s because when you eat it has a crumbly texture, it disintegrates and melts away. It’s not flaky but rather has a tender texture.
When to use this Pâte Sablée or Classic Sweet Tart Pastry
This Pâte Sablée or Classic Sweet Tart Pastry is perfect for sweet pastries. It’s also a pâte sucrée meaning that it has sugar in it. As I said, this is a buttery dough that results in a cookie-like textured tart crust. This means that, just like a cookie, it doesn’t do very well with wet things. Therefore, I don’t recommend that you use it for pies or tarts with lots of liquid in the filling (like apple pie, peach pie, plum pie, pear pie, etc.). Or maybe the filling doesn’t have that much liquid but the pan is deep, that’s not good, either. It could be that it breaks in those cases. It does really well, though, with low-height fillings, gooey fillings or those fillings that don’t need to go back in the oven to cook. For wetter fillings, you need to use a dough such as the one in my apple pie recipe or all of my galette recipes. That one is a pâte brisée type which is more of a flaky pie crust and has a firmer structure.

Ingredients
The ingredients that you will need to make this Pâte Sablée or Classic Sweet Tart Pastry are really easy to obtain at a grocery store. That’s always nice when you want to make it on a daily basis. Ideally, when making this recipe and all pastry recipes, it’s best to use kitchen digital scales to measure the ingredients. That makes for a precise measurement and prevents errors from happening. Here are the ingredients you will need:
- Unsalted softened butter at room temperature. We use the creaming method when mixing the butter with salt and sugar. That’s what will give us the crumbly texture. This is different from when making pâte brisée where we use cold butter.
- Granulated sugar: A bit of sugar will add flavour to our dough.
- Salt: Even though it’s a sweet tart crust, a bit of salt always helps to balance the flavours.
- Egg: The egg will bind all the ingredients together.
- All-purpose flour: The flour will give structure to the tart dough. Some recipes use a mix of all-purpose wheat flour and almond flour. Here I opted to not use the almond flour as it increases the cost of the recipe and also makes it more complex to use on a day-to-day basis.
The method for making Pâte Sablée or Classic Sweet Tart Pastry
Bringing the dough together is the easiest step when making Pâte Sablée or Classic Sweet Tart Pastry. You can make it by hand using a whisk and a bowl or use a stand mixer on medium speed. Here are the 3 steps you will need:
- Whisk together the butter with the sugar and salt until it’s creamy and homogeneous. At this point, you could also add spices and citrus fruits’ zest if you like.
- Add the egg and whisk it in until it’s back to creamy (it will look split at first).
- Add the flour and mix it in using a spatula. When the spatula doesn’t help anymore, finish mixing with the palm of your hands. Place the dough on a clean surface and knead only until fully homogeneous and no longer sticking to your hands. Don’t knead it more than what’s necessary; only enough to mix it.
Shaping the dough
Once the Pâte Sablée or Classic Sweet Tart Pastry is ready, you won’t refrigerate it but rather roll it out while it’s at room temperature. This is because it’s extremely buttery and rolling it out (even if it’s cold) on a floured work surface would be nearly impossible. Instead, what we do is roll the between two sheets of parchment paper using a rolling pin. After that, we refrigerate it on a flat surface so that we can cut it to size to line the tart pan. Once you have a flat and cold dough, here’s how you will shape it:
- Remove the dough from the fridge and unstick the paper from both sides and then only keep the paper that’s under the tart. We’re doing this only so that the dough isn’t completely stuck to the paper. Use the tart ring to cut the base disc. If you’re using a removable bottom tart pan then cut around the removable bottom base with a small knife.
- In the case of the tart ring, cut the paper around the ring using a knife or a pair of scissors. Place the paper, dough and ring onto a dish that can fit your freezer. If you’re using a removable bottom pan, lift the dough carefully and place it inside the pan with the base on. If it breaks in half don’t worry – you can stick it back in place by gently pressing on it.
- For the sides, cut strips of dough that are thicker than the height of the tart. Place one strip at a time around the edge, pressing gently to stick them in place. Keep going until you’ve reached the last one. For the last strip, you arrange it in place and use a knife to cut it to the edge of the start of the first one you laid out. I think it’s easier to understand if you watch the video above.
- Use a non-dented small knife to cut the dough to the edges of the pan.
Baking the tart crust
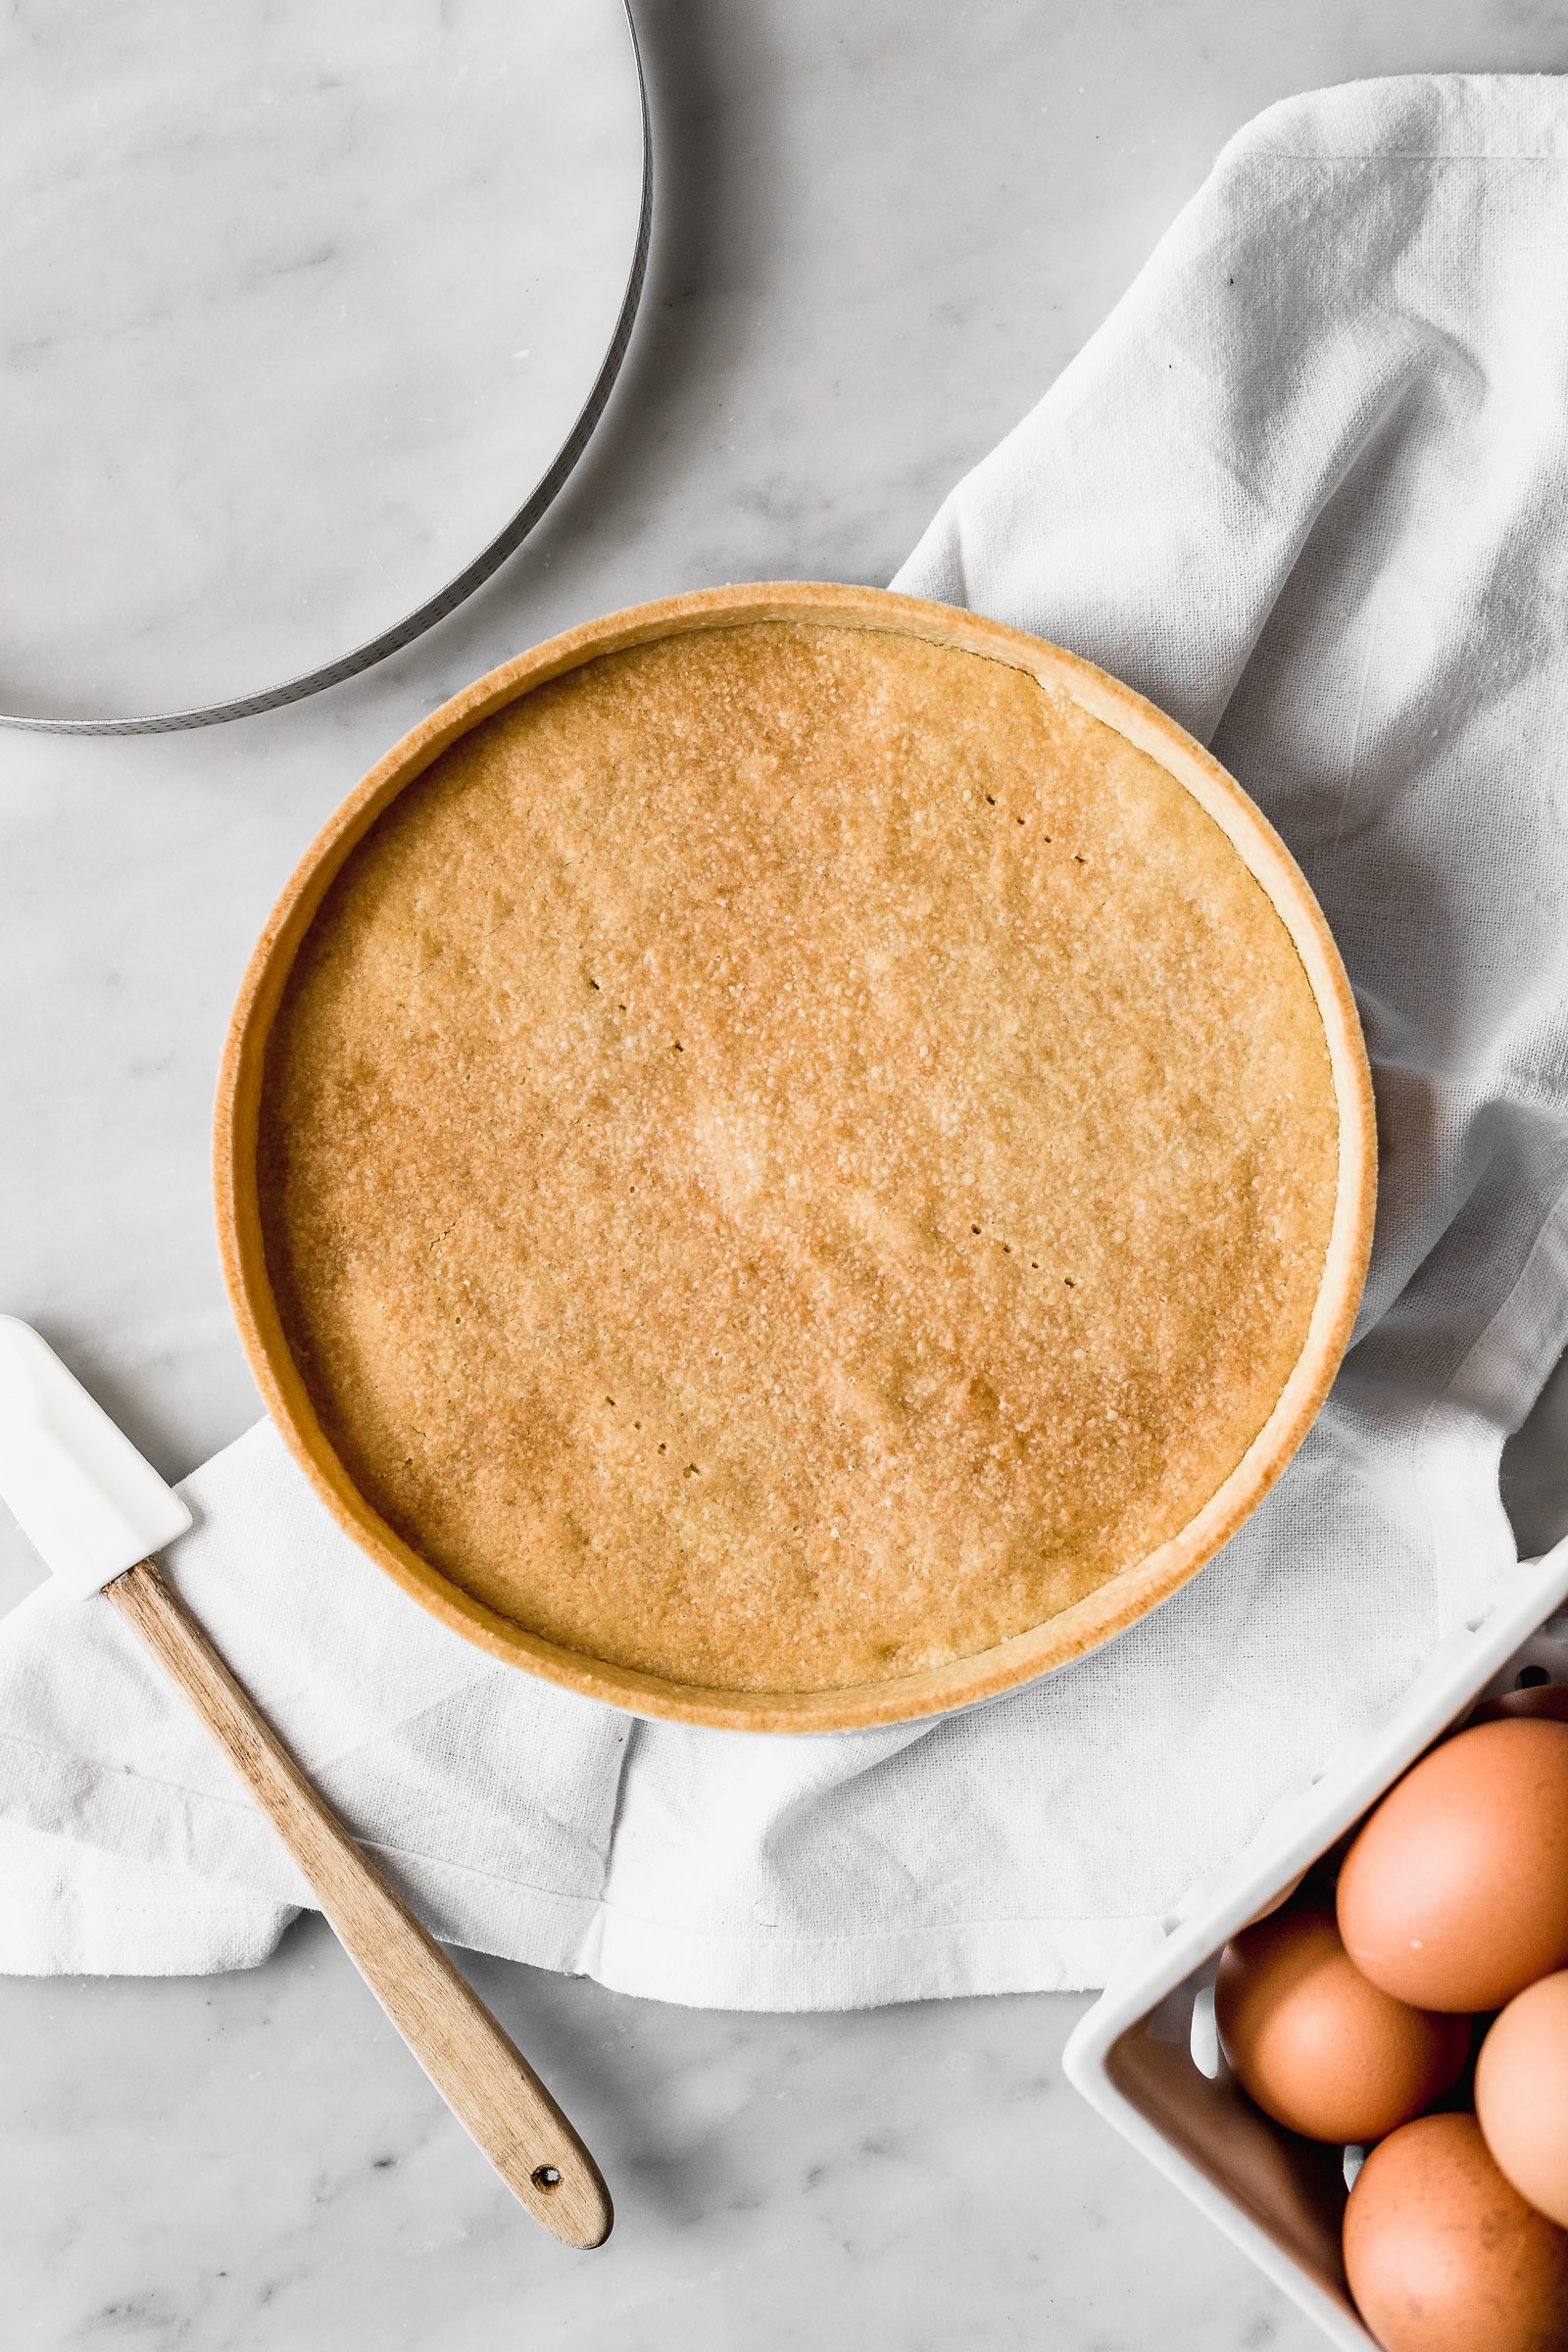
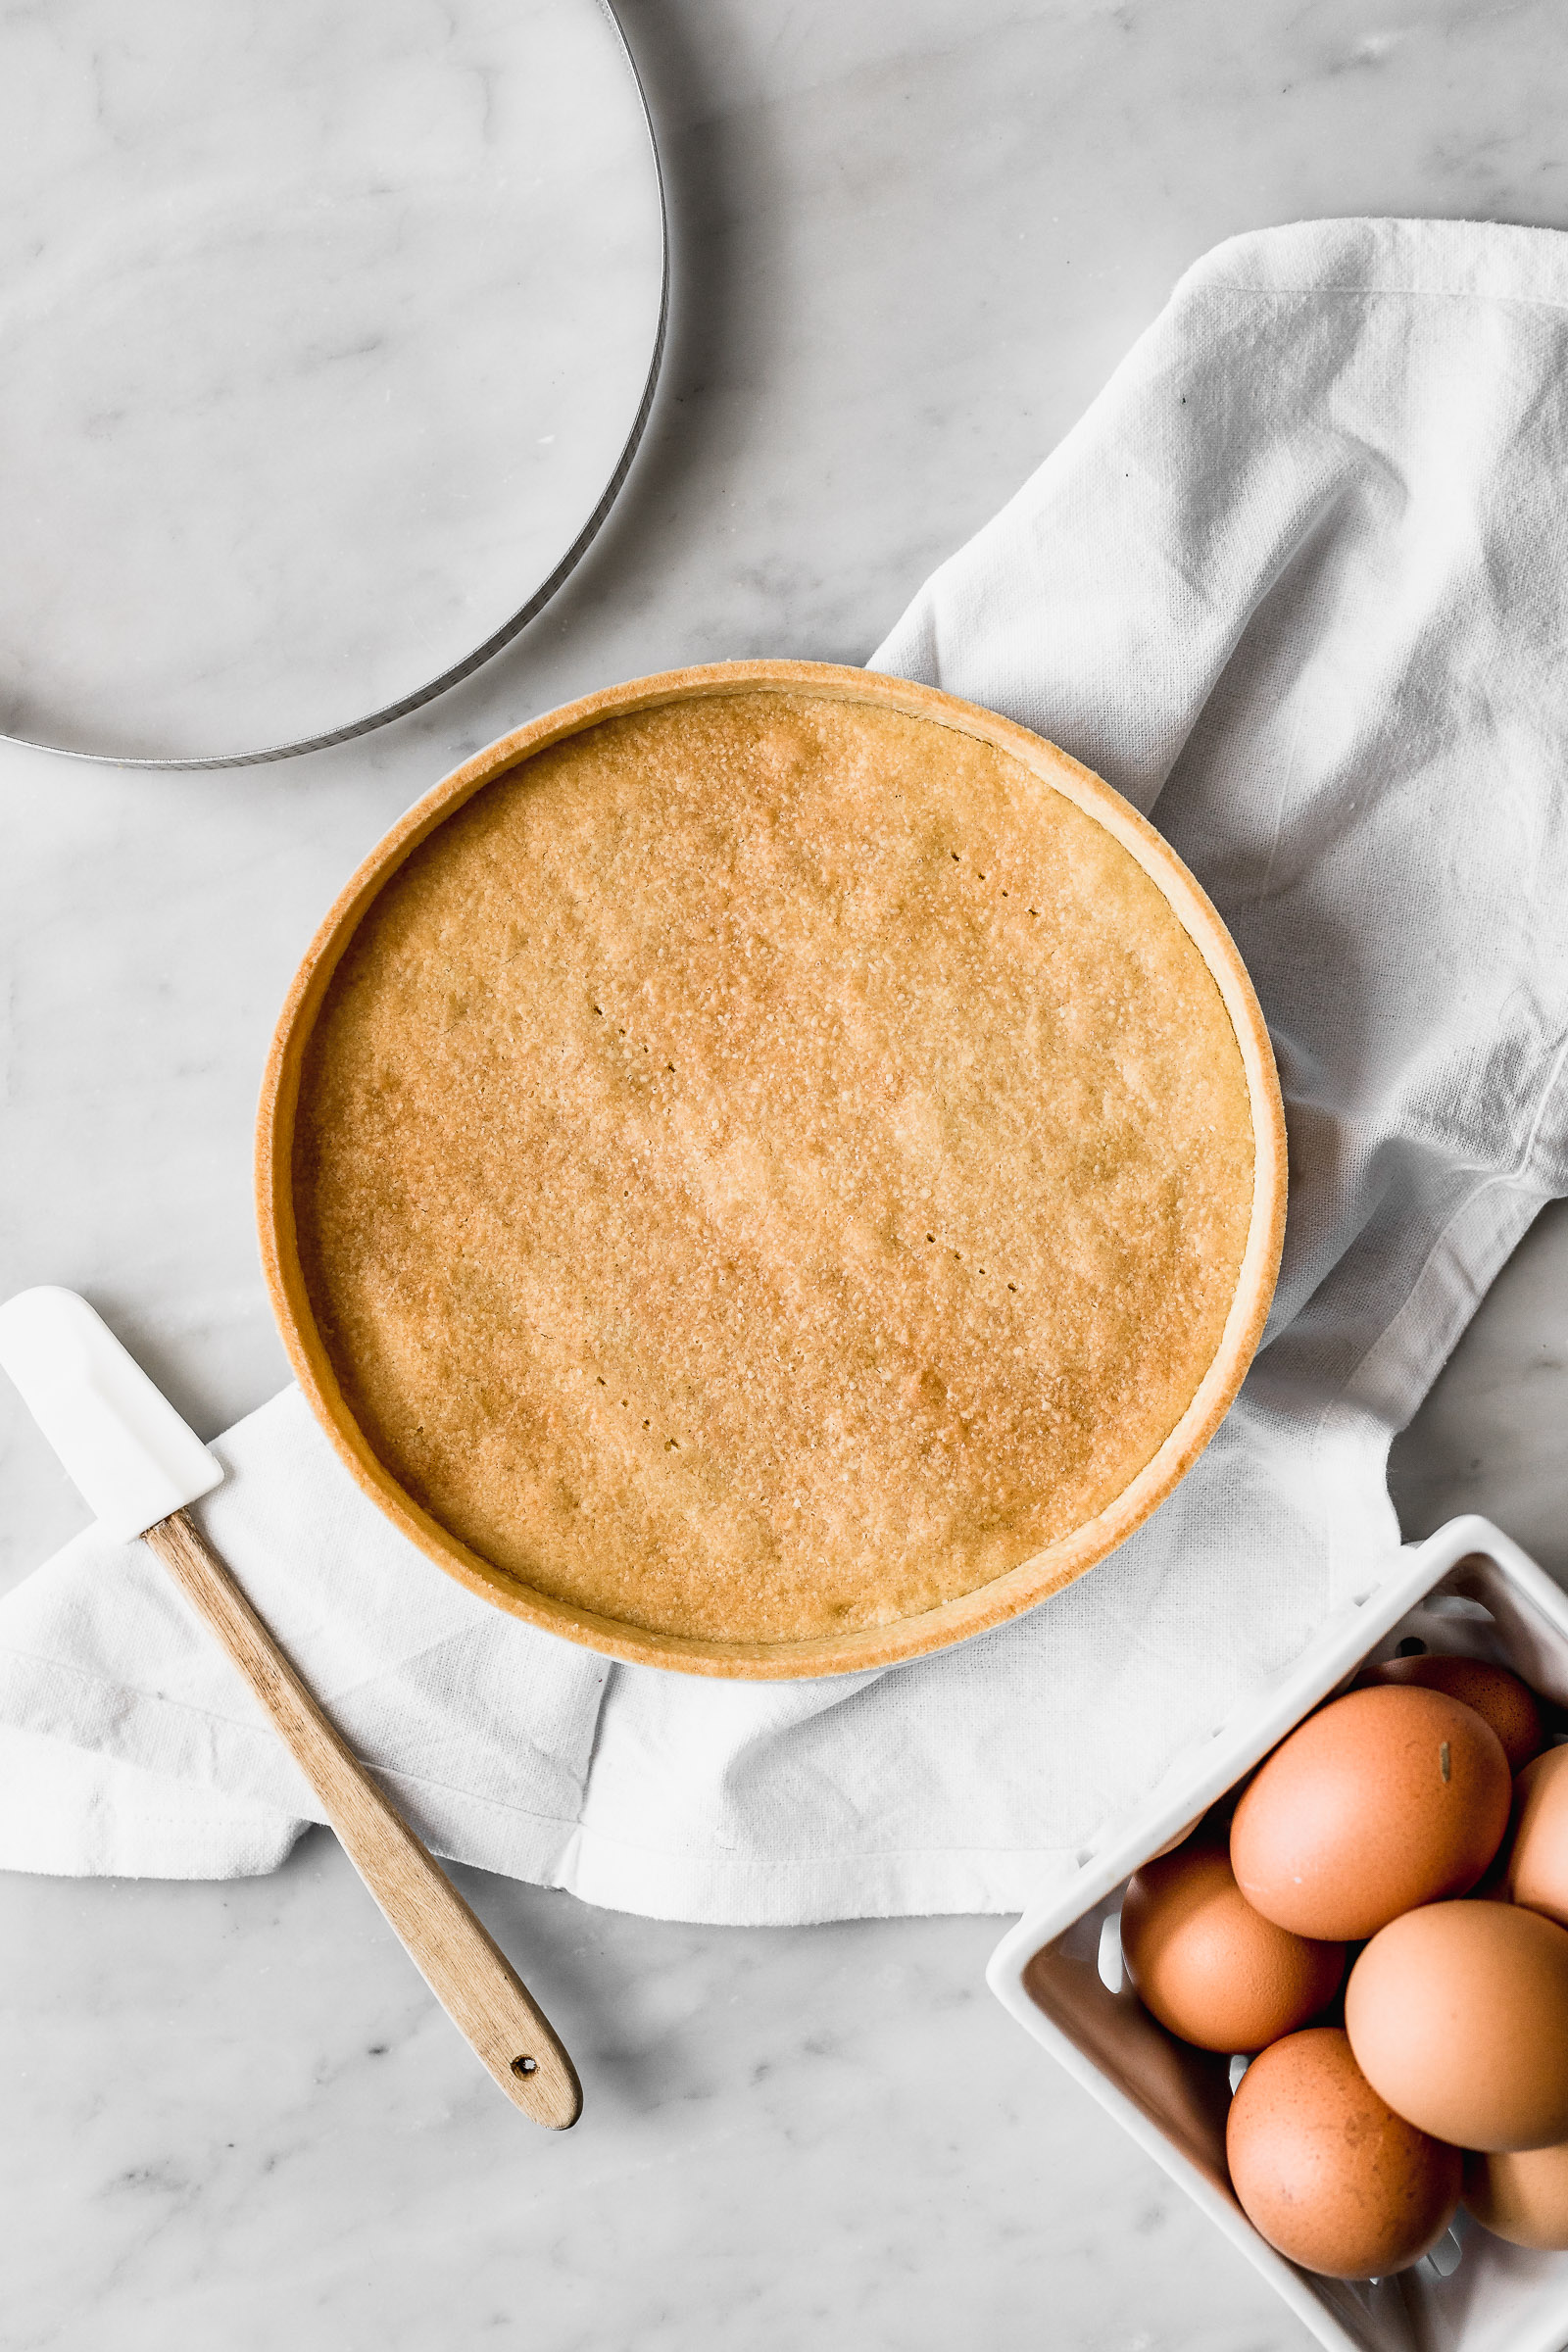
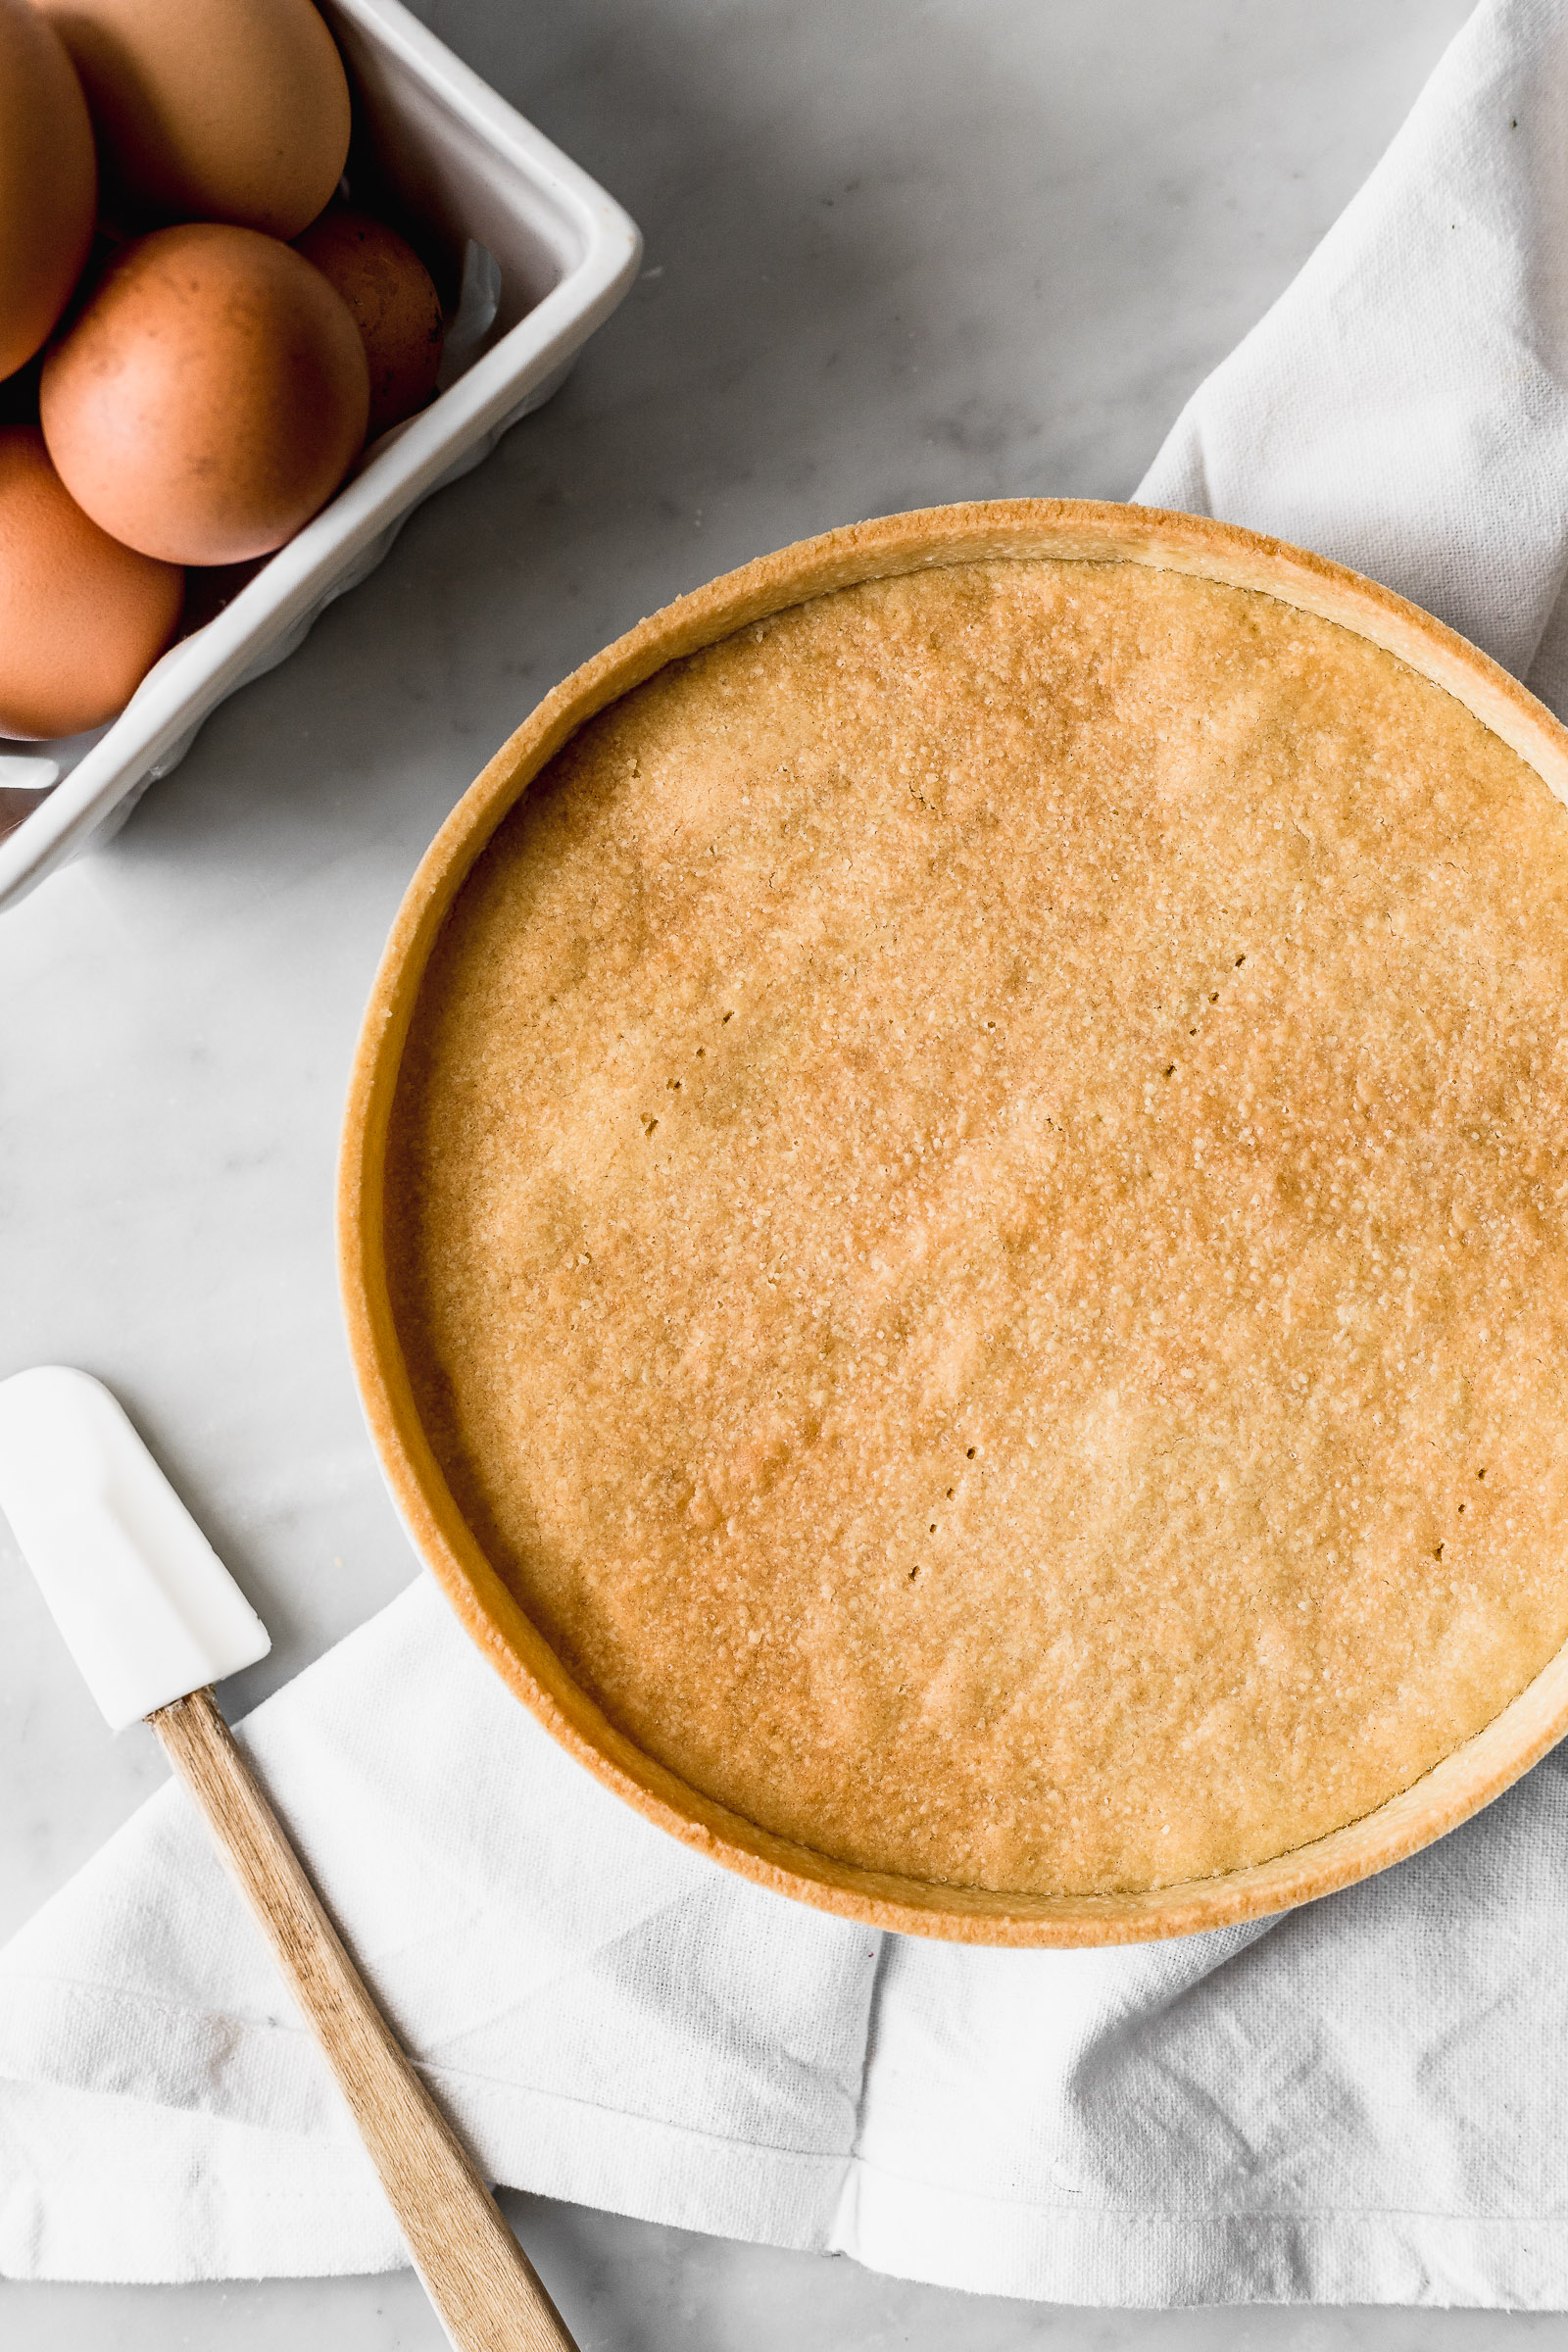
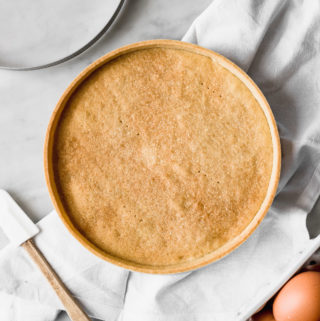
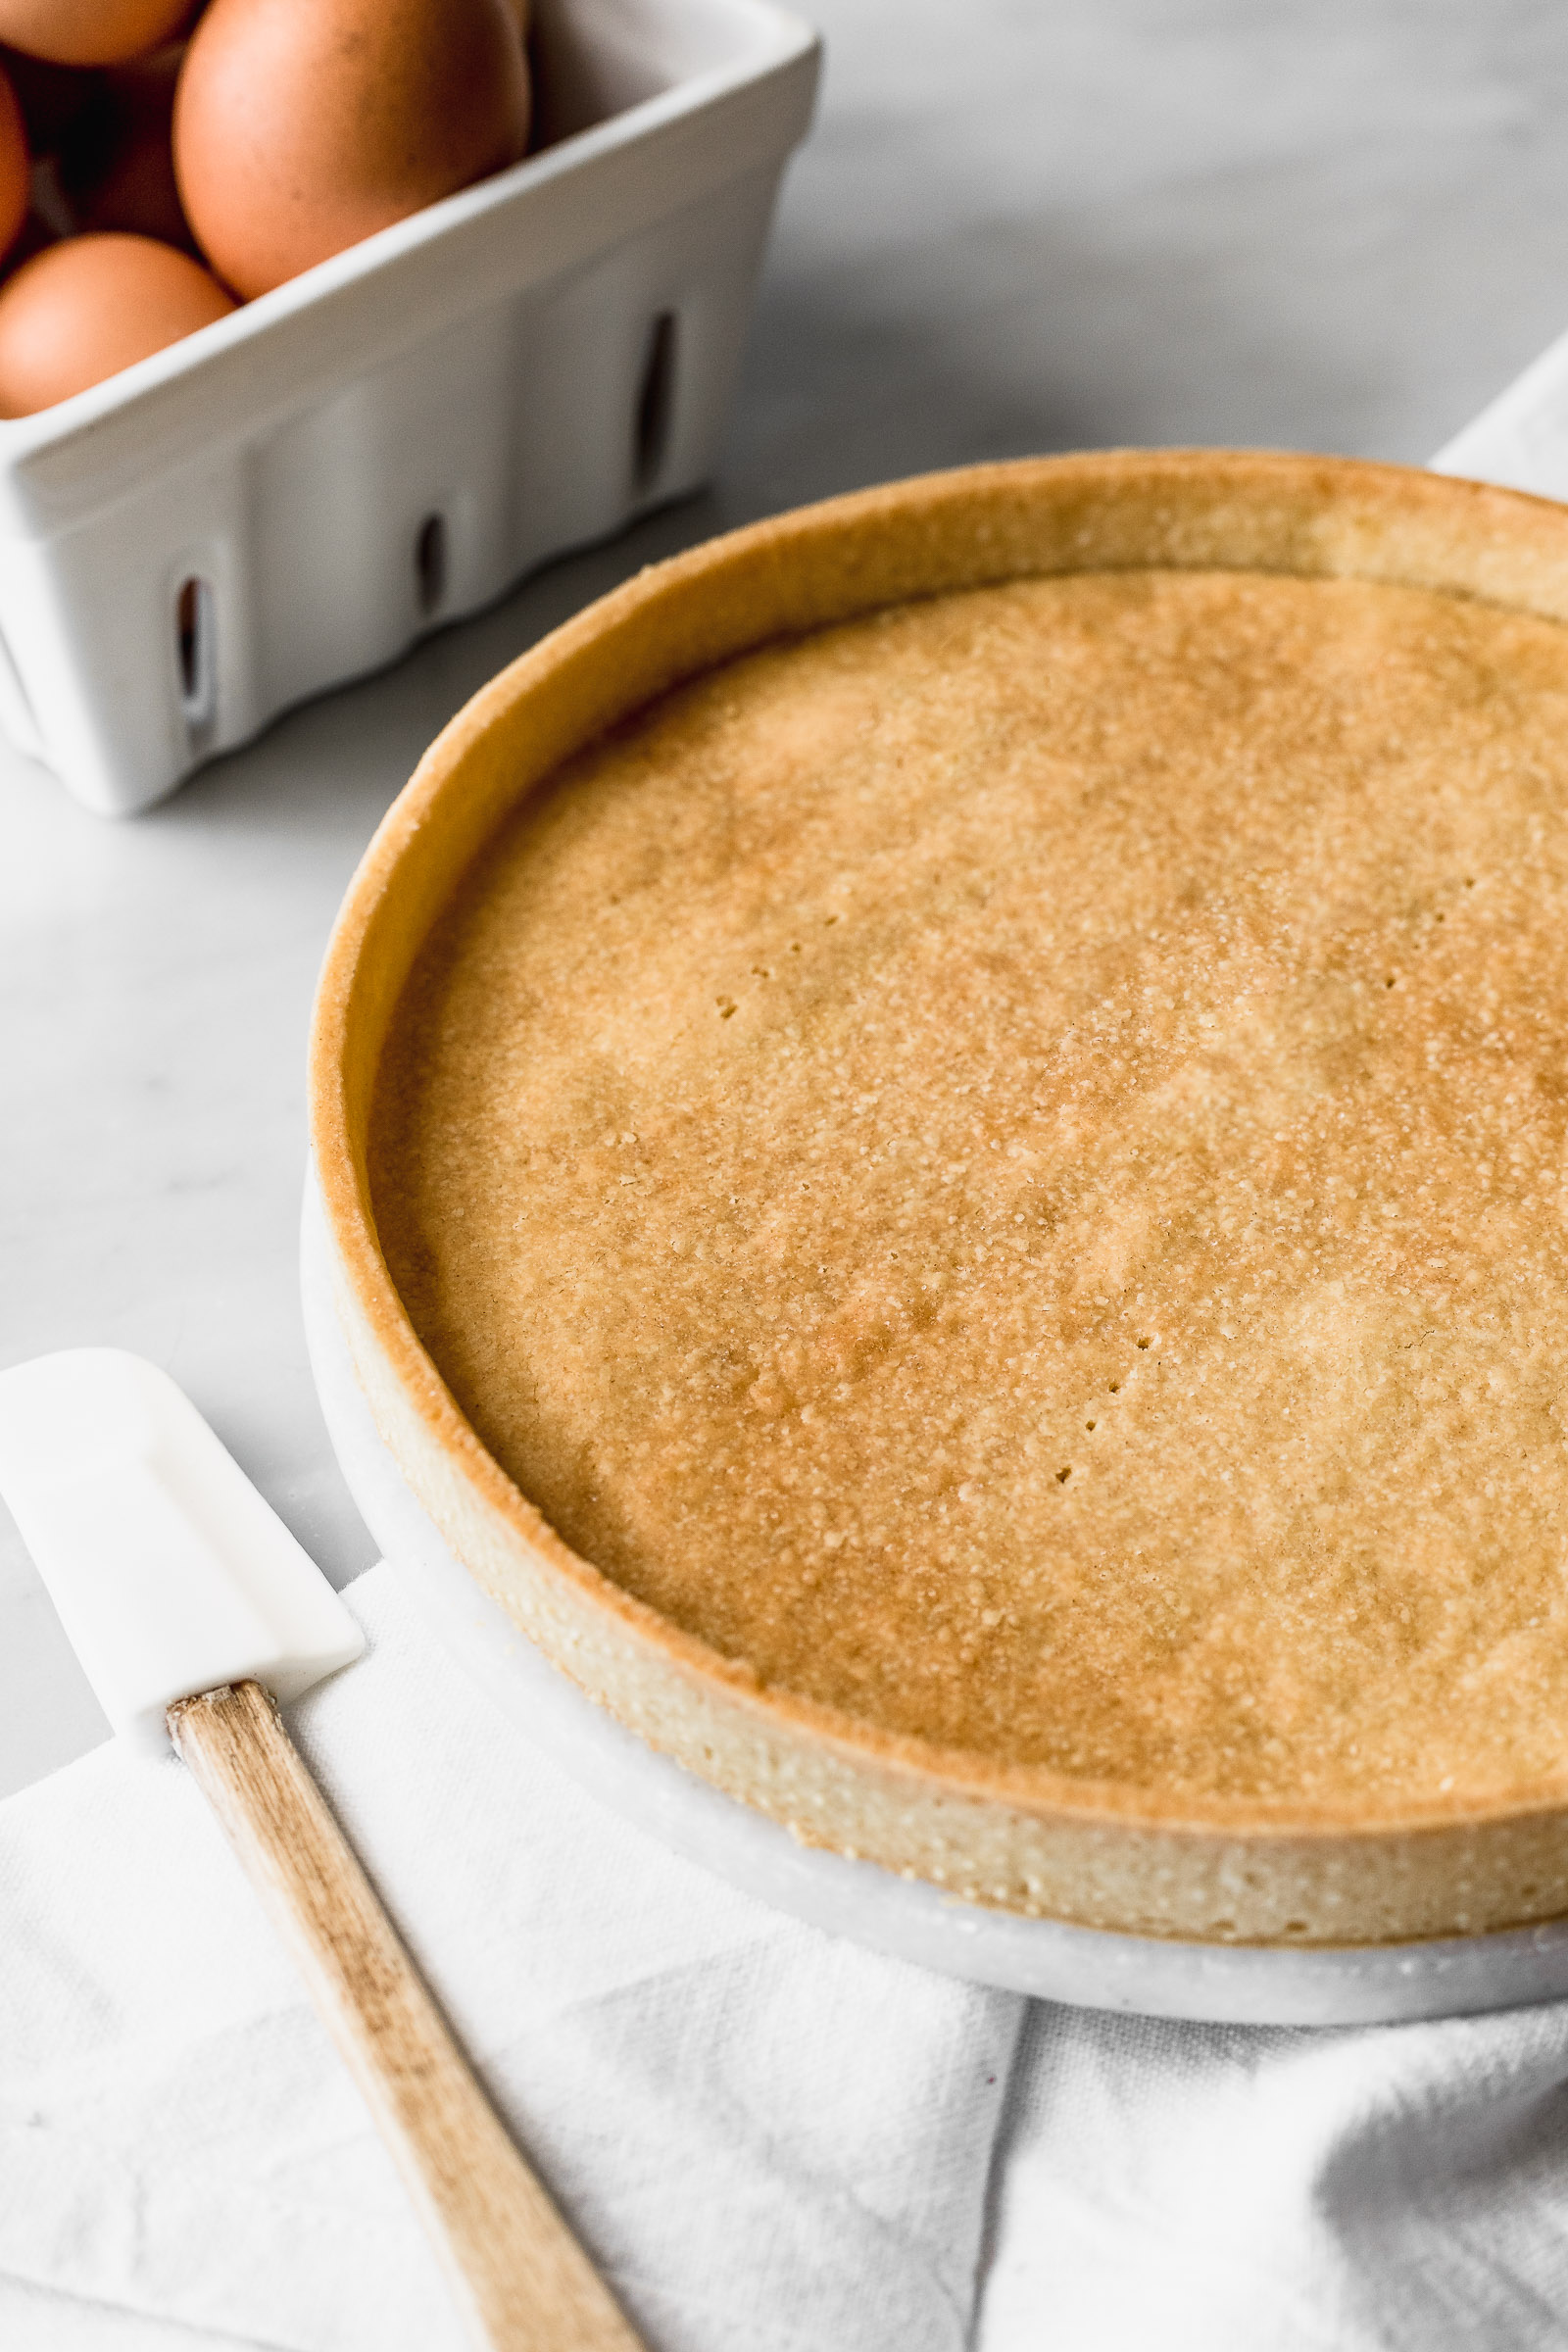
What’s great about my method is that you don’t need to blind bake Pâte Sablée or Classic Sweet Tart Pastry which is always a hassle. That avoids using pie weights, decreases baking time and gets more even golden brown all around the tart shell. It’s just a great option when you want perfect results. What I do is freeze the tart dough in the pan for a couple of hours before baking. This makes it so that it doesn’t need a blind bake! This is what you will do once the tart pan is lined:
- Freeze the dough inside the pan or ring for 1 hour or up to 2 days.
- Preheat your oven to 160°C / 320°F.
- Remove the dough from the freezer and poke it at the base 4-6 times with a fork to prevent it from inflating.
- Bake the unfilled tart shell immediately (yes, while frozen!) for 12-18 minutes. The first time you make it you want to be really careful and take a close look as it cooks because it goes from light golden to dark in very little time.
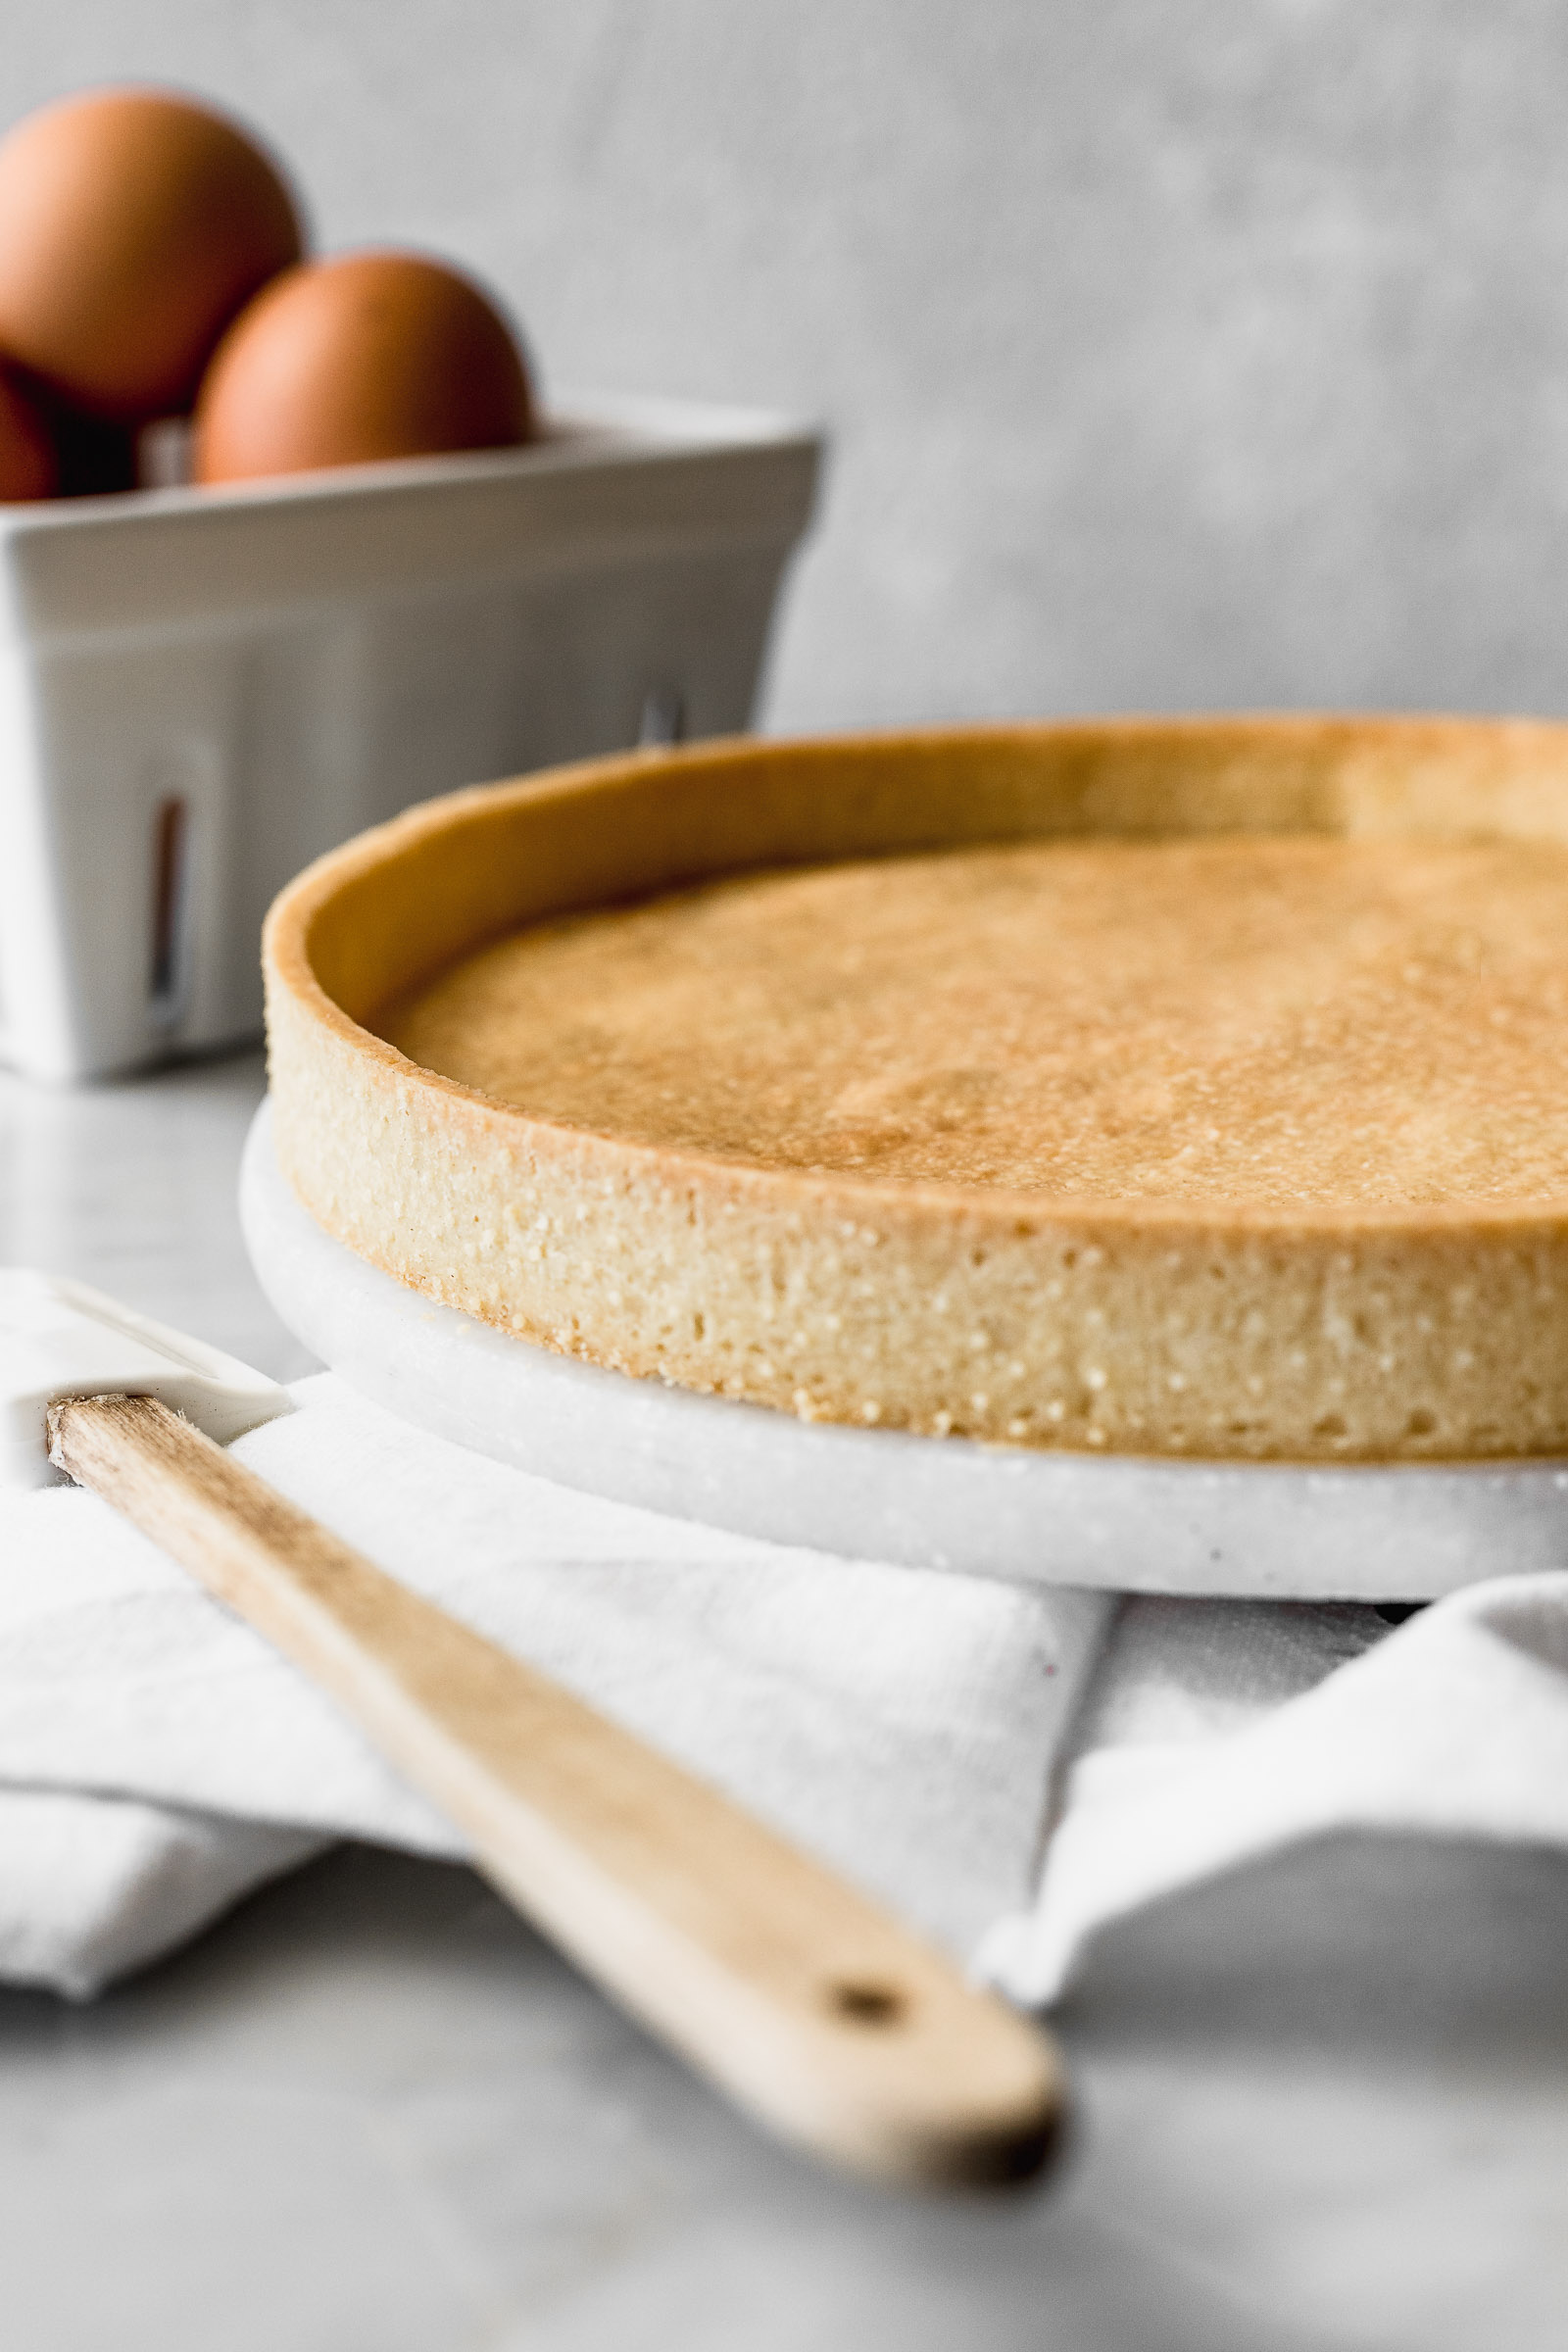
- Remove the tart from the oven and let it cool down completely before unmolding.
- The dough always shrinks a little as it bakes, so to remove the ring you only need to lift it carefully. In the case of the removable bottom pan, you need to place it on top of a bowl and help the sides slide down slowly. At this point, you should be able to lift the tart shell from the base.
Tart ring vs removable bottom tart pan
In the video and the photos for this Pâte Sablée or Classic Sweet Tart Pastry, you’ll notice that I used a tart ring to make this tart shell. By using a ring you get this nice French pastry chefs’ style finish that looks much more delicate and refined. If you sell tarts/pies I recommend that you try to make them using a ring because you can even increase your price for them just because of how they look. The ring that I used in the video is perforated but you can use a plain one instead if you prefer. Here’s the perforated ring that I bought on Amazon*. Alternatively, you can buy a plain ring* that, in my opinion, works equally fine. The other option for you is to use a removable bottom tart pan/tart tin. I like this tart pan that has tall sides. The recipe works as well with this type of pan and also doesn’t require blind baking. The result is also a beautiful pastry case that’s tasty too.
Recipes where you can use Pâte Sablée (Classic Sweet Tart Pastry)
This type of tart case is perfect for many recipes. As if mentioned before it’s my favourite because of its lovely texture. It’s ideal for large tarts, mini tarts, small tartlets, etc. Here are a few recipes where you can use this Pâte Sablée or Classic Sweet Tart Pastry:
- Berry tarts: make sure to cook the filling before placing it inside the baked Pâte Sablée shell.
- Ganache tart: bake the dough, wait for it to cool down completely and fill it up with the ganache.
- Lemon curd tart: It’s perfect for lemon tarts! Bake the dough, wait for it to cool down completely and fill it up with the curd.
- Lime meringue pie: bake the dough, wait for it to cool down, fill it up and return to the oven to cook the filling.
- Pastry Cream Fruit Tarts: Bake the dough, wait for it to cool down, fill it up with pastry cream and refrigerate it. Then, top with fresh fruit.
Pâte Sablée (Classic Sweet Tart Pastry)
Ingredients
- 150 g unsalted butter soft, at room temperature
- ½ tsp salt
- 50 g granulated sugar
- 1 egg
- 250 g all-purpose flour
Instructions
For the dough
- Whisk together the butter with the sugar and salt until it's creamy and homogeneous. At this point, you could also add spices and citrus fruits' zest if you like.
- Add the egg and whisk it in until it's back to creamy (it will look split at first).
- Add the flour and mix it in using a spatula. When the spatula doesn't help anymore, finish mixing with your hands. Place the dough on a clean surface and knead only until fully homogeneous and no longer sticking to your hands. Don't knead it more than what's necessary; only enough to mix it.
For the tart assembly
- Roll out the dough in between two sheets of baking paper. It needs to be 2mm thick. Once you've achieved this, take the dough (with paper and all) into the fridge for 2 hours or until it's firm and a maximum of 2 days. I first placed it on a chopping board and then put that into the fridge to keep it flat.
- Remove the dough from the fridge and unstick the paper from both sides and then only keep the paper that's under the tart. We're doing this only so that the dough isn't completely stuck to the paper. Use the tart ring to cut the base disc. If you're using a removable bottom tart pan then cut around the removable bottom base with a small knife.
- In the case of the tart ring, cut the paper around the ring using a knife or a pair of scissors. Place the paper, dough and ring onto a dish that can fit your freezer. If you're using a removable bottom pan, lift the dough carefully and place it inside the pan with the base on. If it breaks in half don't worry – you can stick it back in place by gently pressing on it.
- For the sides, cut strips of dough that are thicker than the height of the tart. Place one strip at a time around the edge, pressing gently to stick them in place. Keep going until you've reached the last one. The last strip you arrange it in place and use a knife to cut it to the edge of the start of the first one you laid out. I think it's easier to understand if you watch the video above.
- Use a non-dented small knife to cut the edge to the rim of the pan or ring.
- Freeze the dough inside the pan or ring for 1 hour or up to 2 days.
For baking and unmolding
- Preheat your oven to 160°C / 320°F.
- Remove the dough from the freezer and poke it at the base 4-6 times with a fork to prevent it from inflating.
- Bake the tart immediately (yes, while frozen!) for 12-18 minutes. The first time you make it you want to be really careful and take a close look as it cooks because it goes from light golden to dark in very little time.
- Remove the tart from the oven and let it cool down completely before unmolding.
- The dough always shrinks a little as it bakes, so to remove the ring you only need to lift it carefully. In the case of the removable bottom pan, you need to place it on top of a bowl and help the sides slide down slowly. At this point, you should be able to lift the tart shell from the base.
- Don! Now you can fill it up 🙂
2 comments
Hey! Can I use this recipe for mini tarts? I have these perforated rings that I want to try this with!
Yes!