
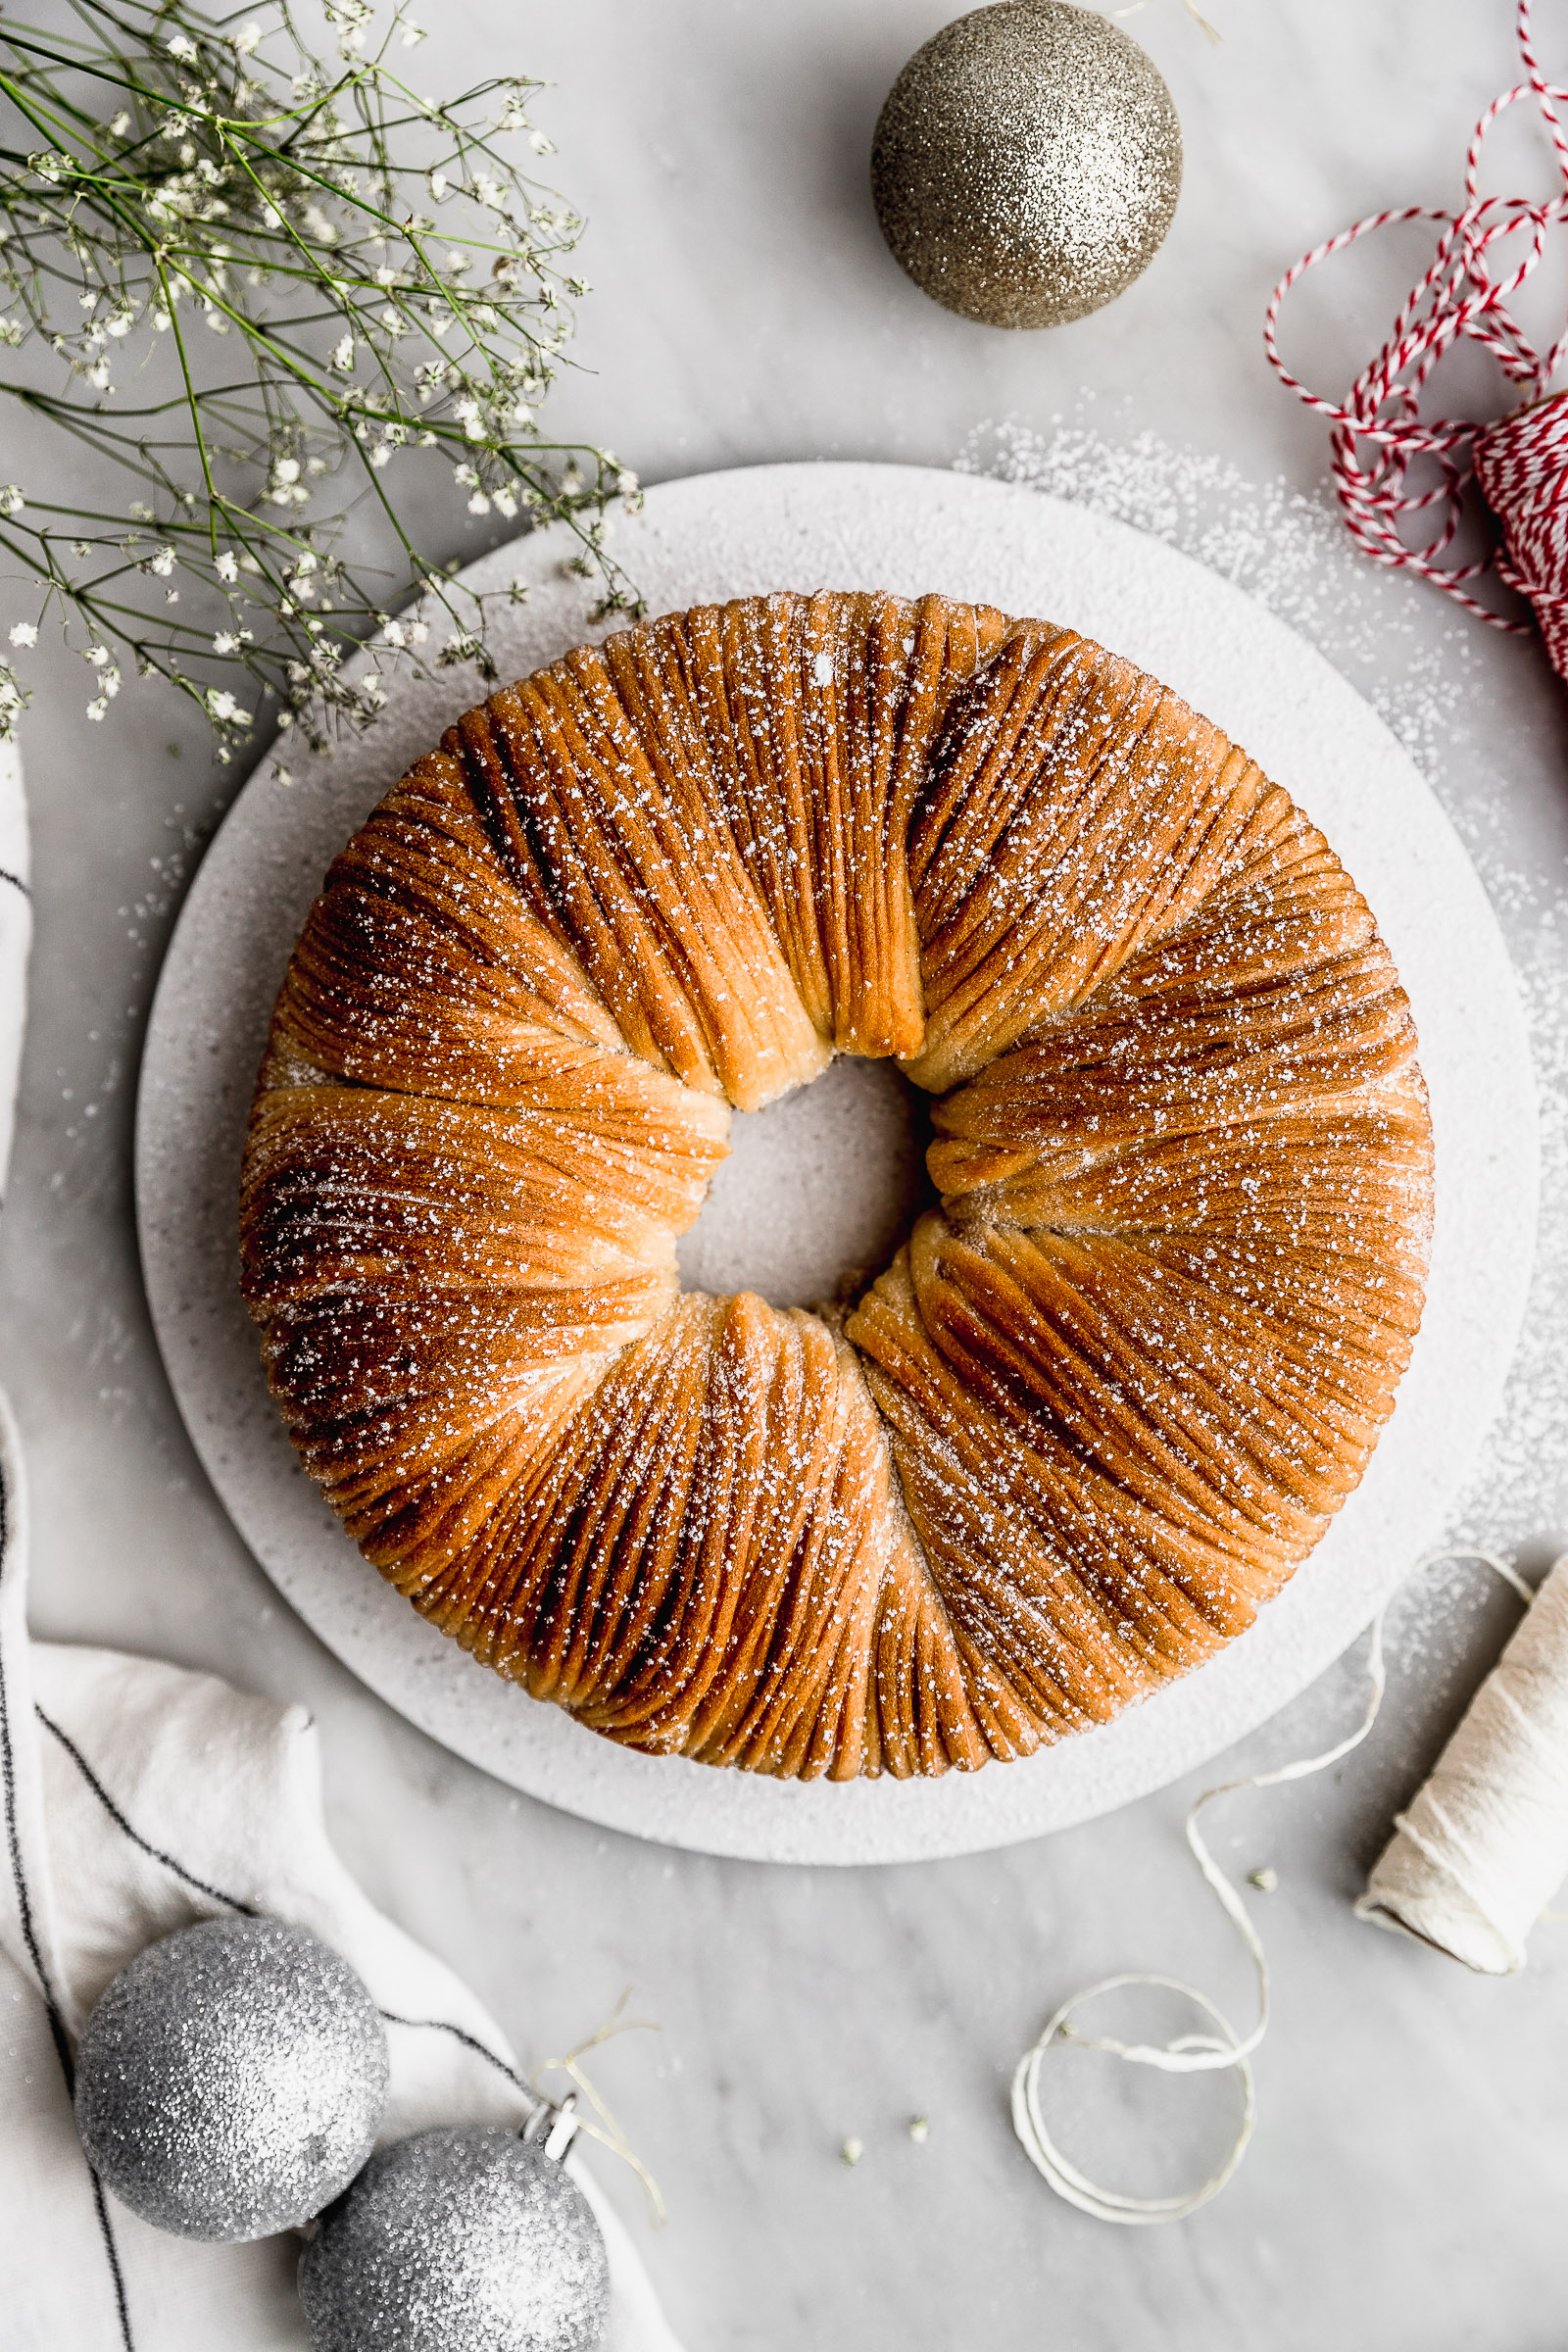
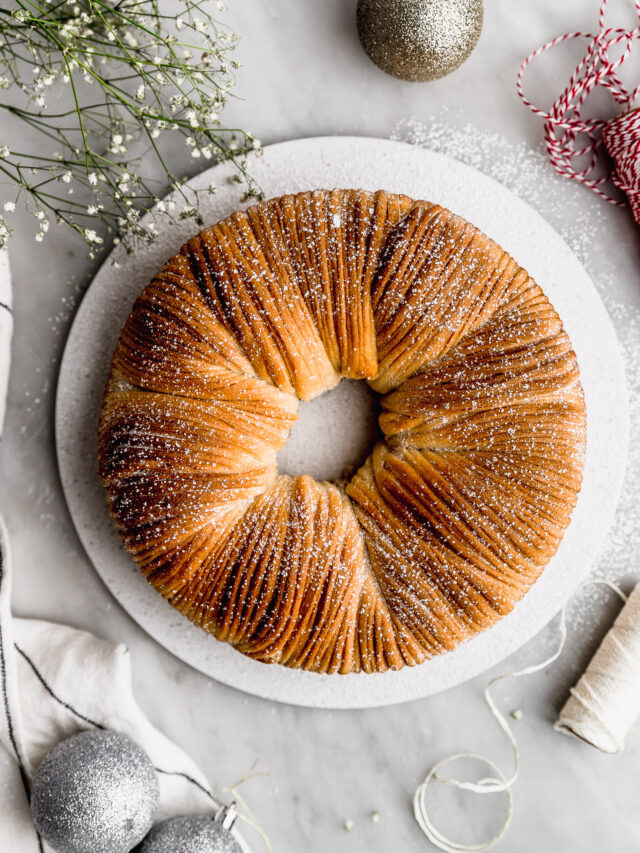
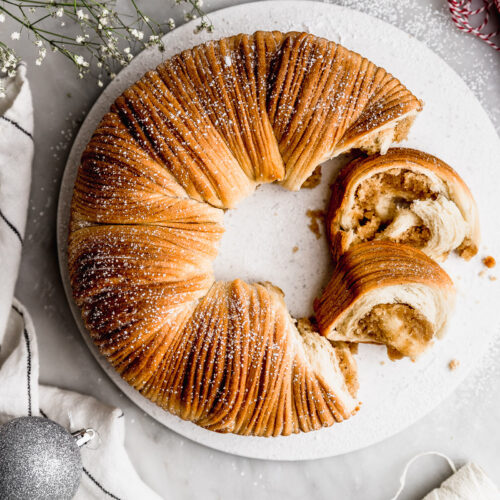
Wool Roll Bread has started to pop up on all my social media lately. Since I saw it the first time I knew I had to make it. It also looks particularly Christmasy. Why? No idea, lol! I think wool makes me think of cosy weather. The filling in this wool roll bread is an almond paste (frangipane) with a spice mix, it gives cinnamon sugar vibes but with more depth of flavour. I made this recipe last year and it was a complete hit with my friends and family!
About this Wool Roll Bread
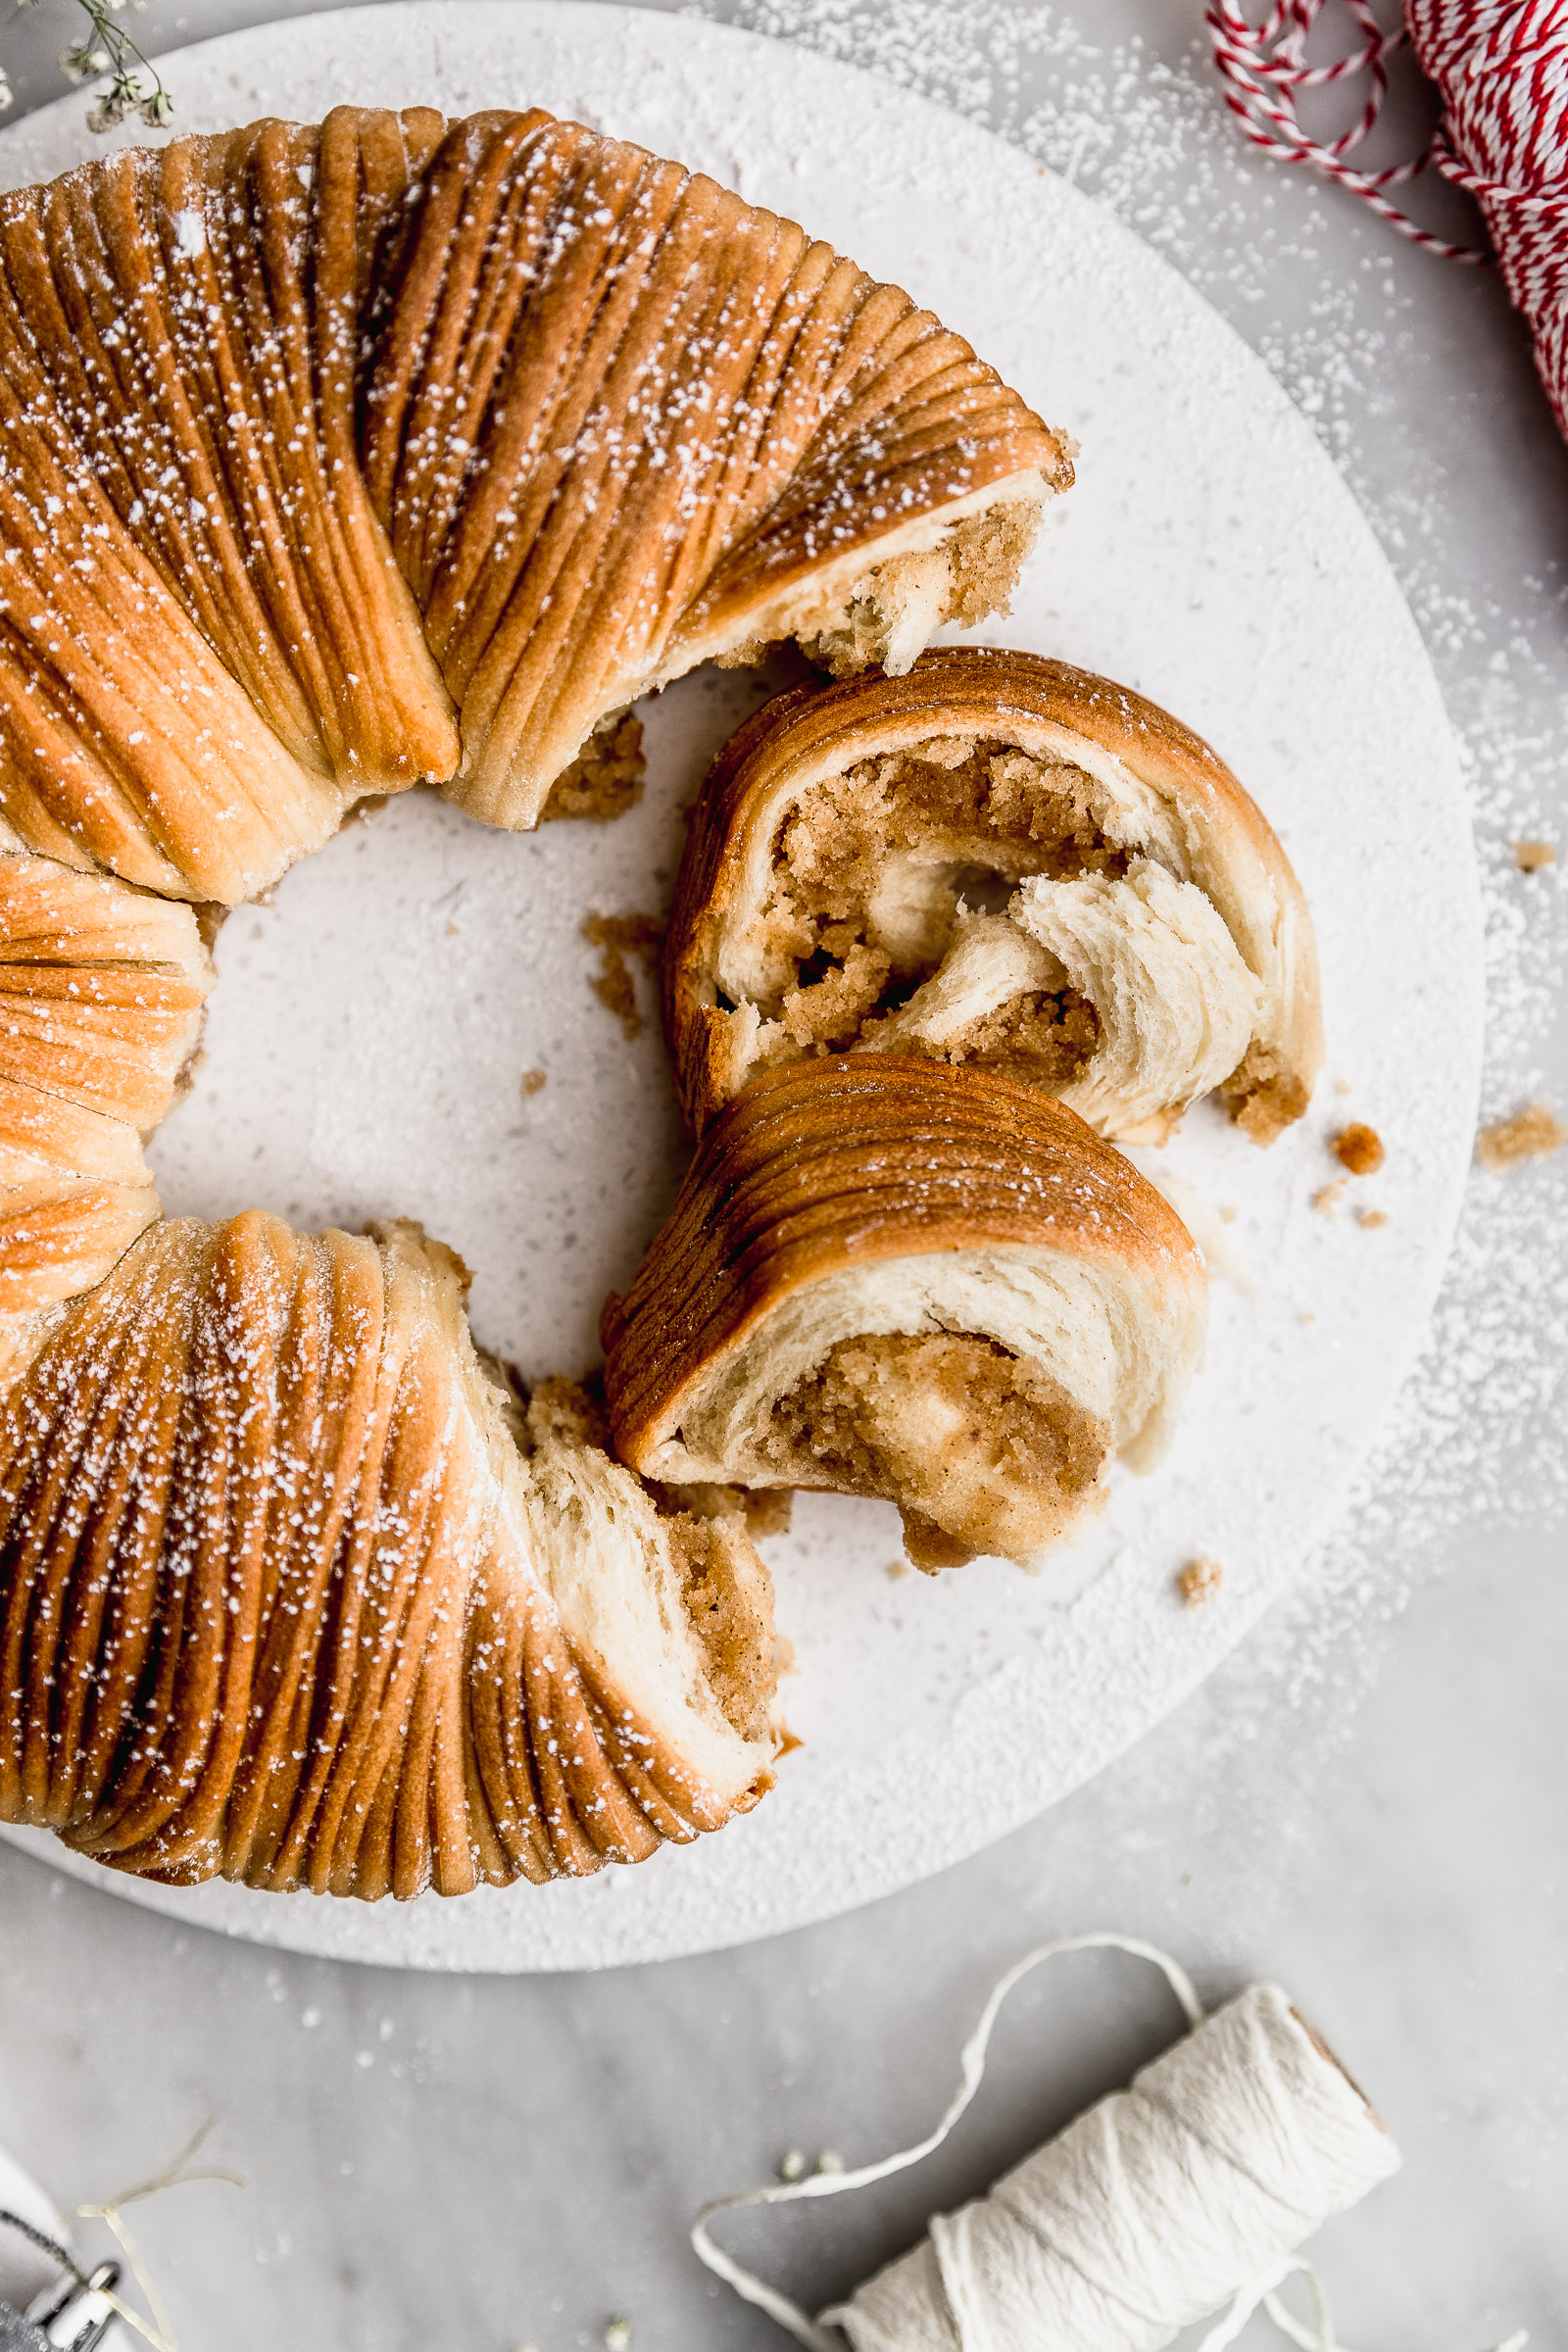
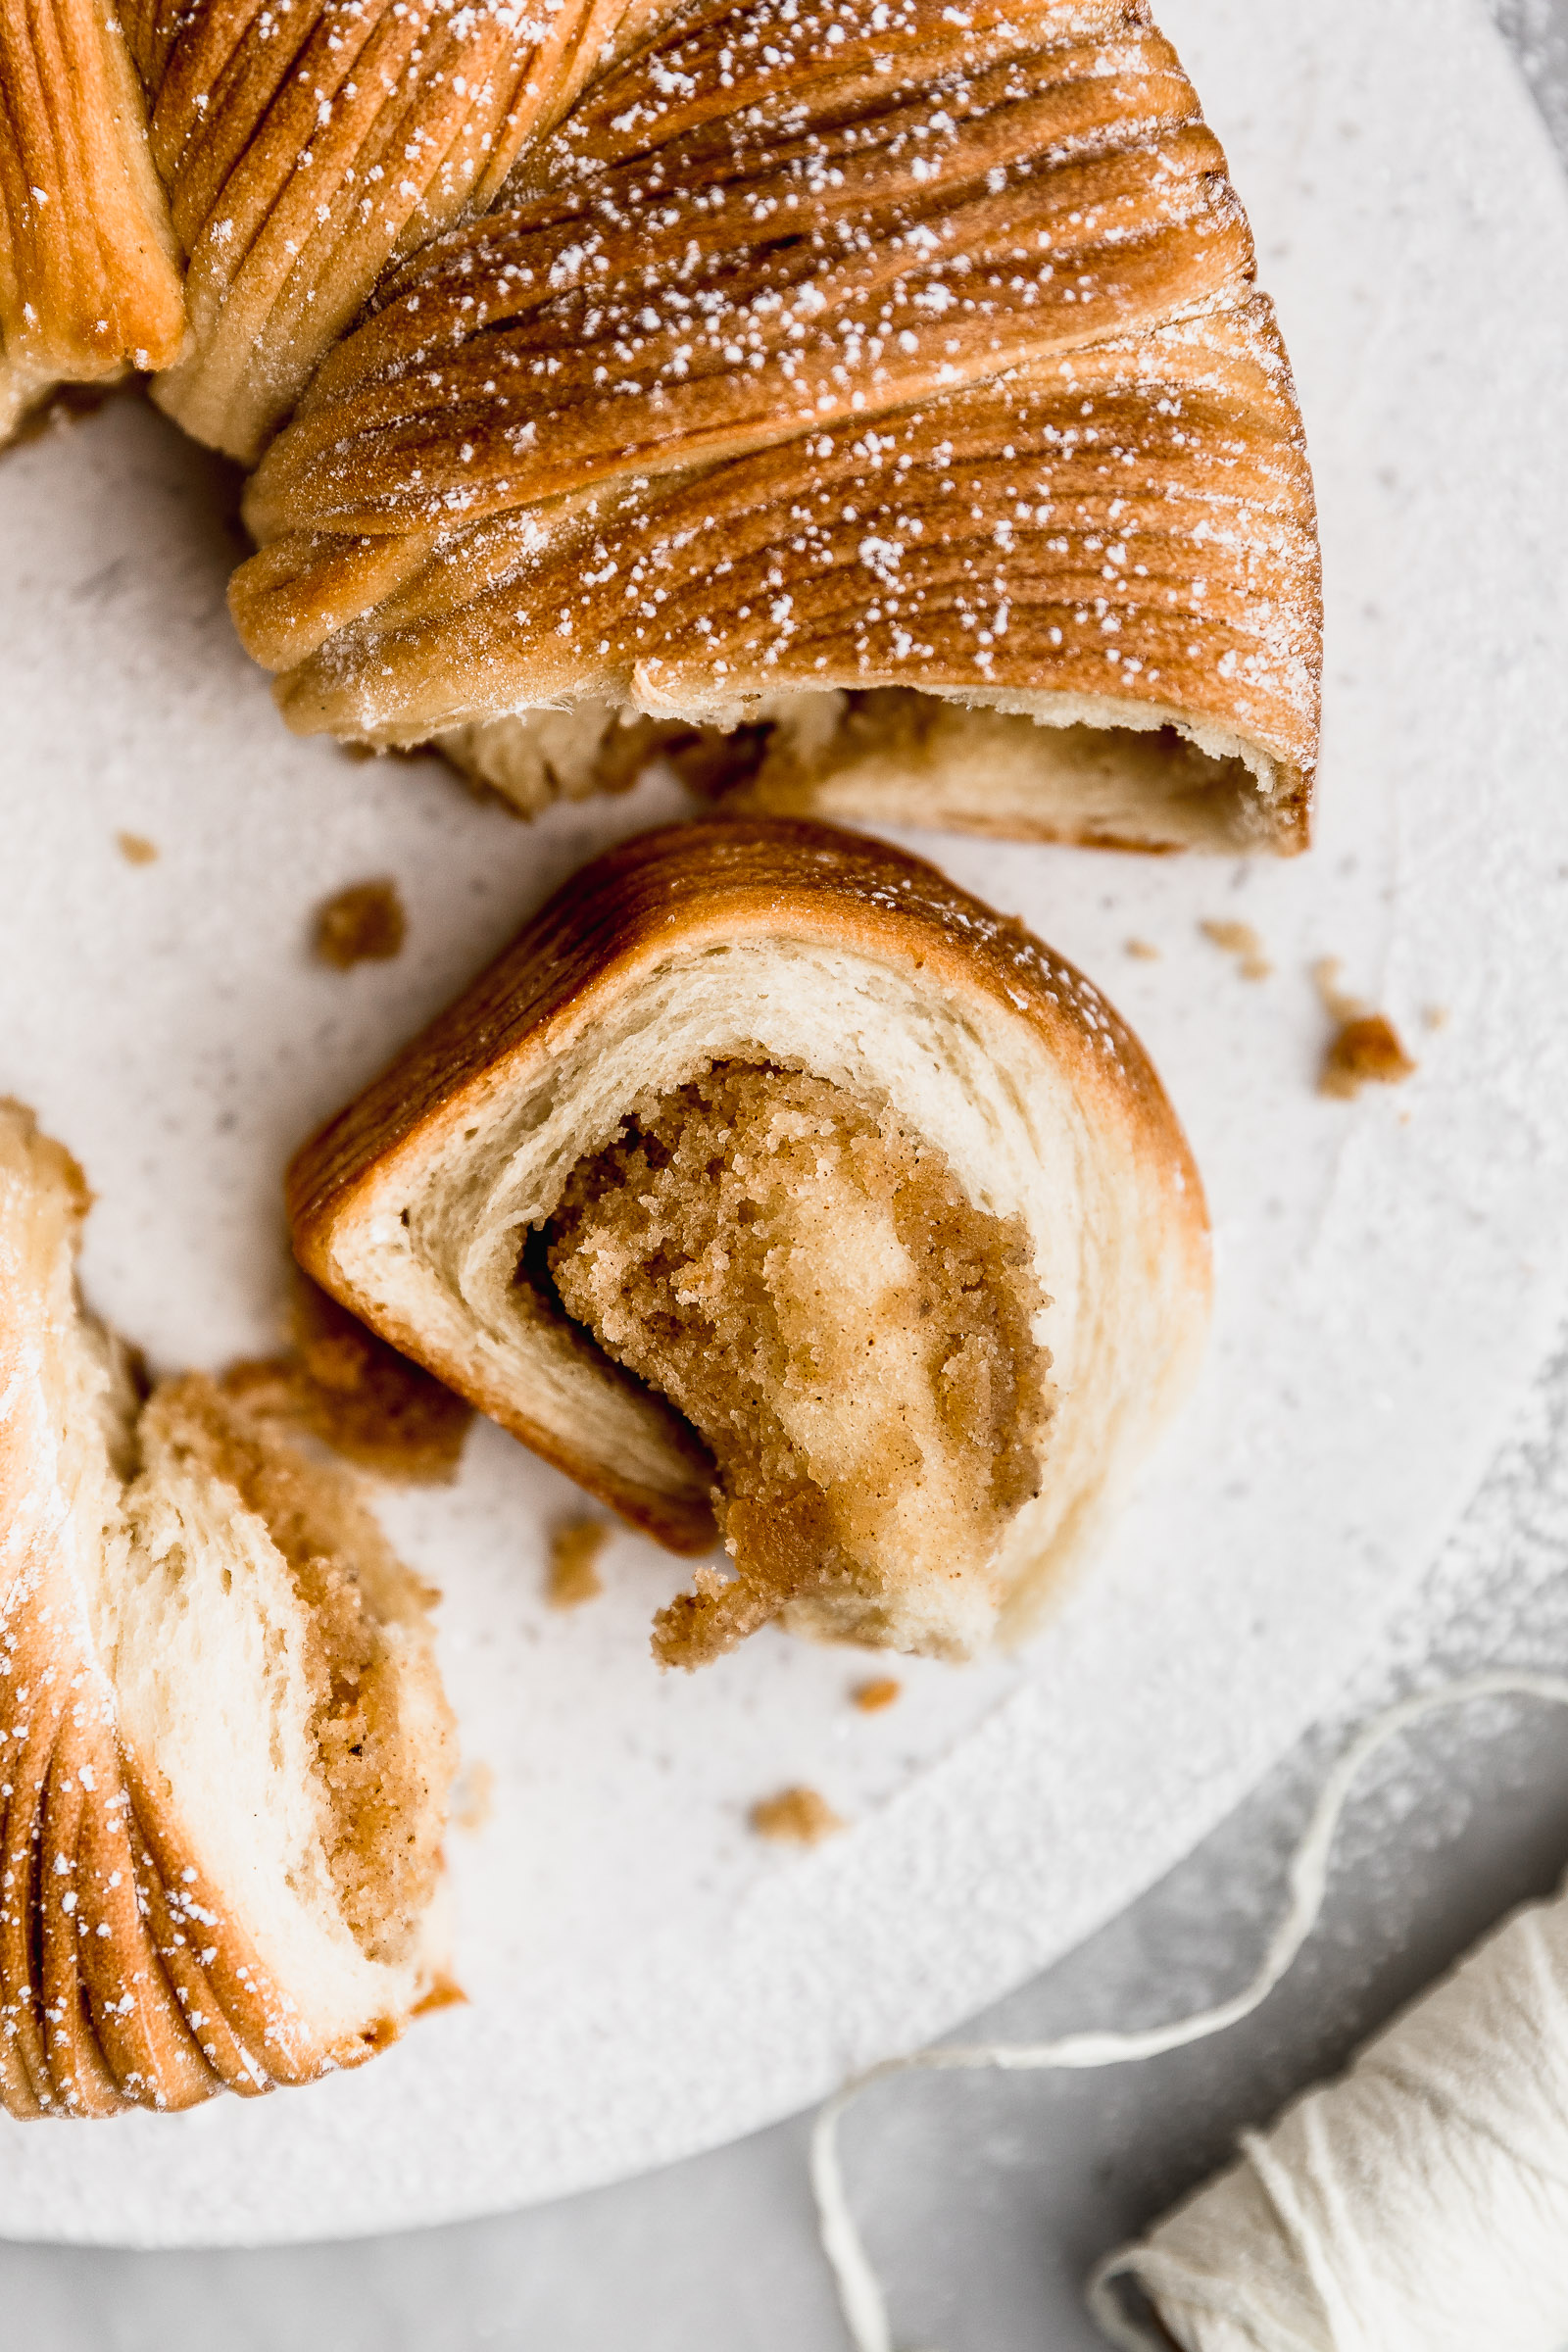
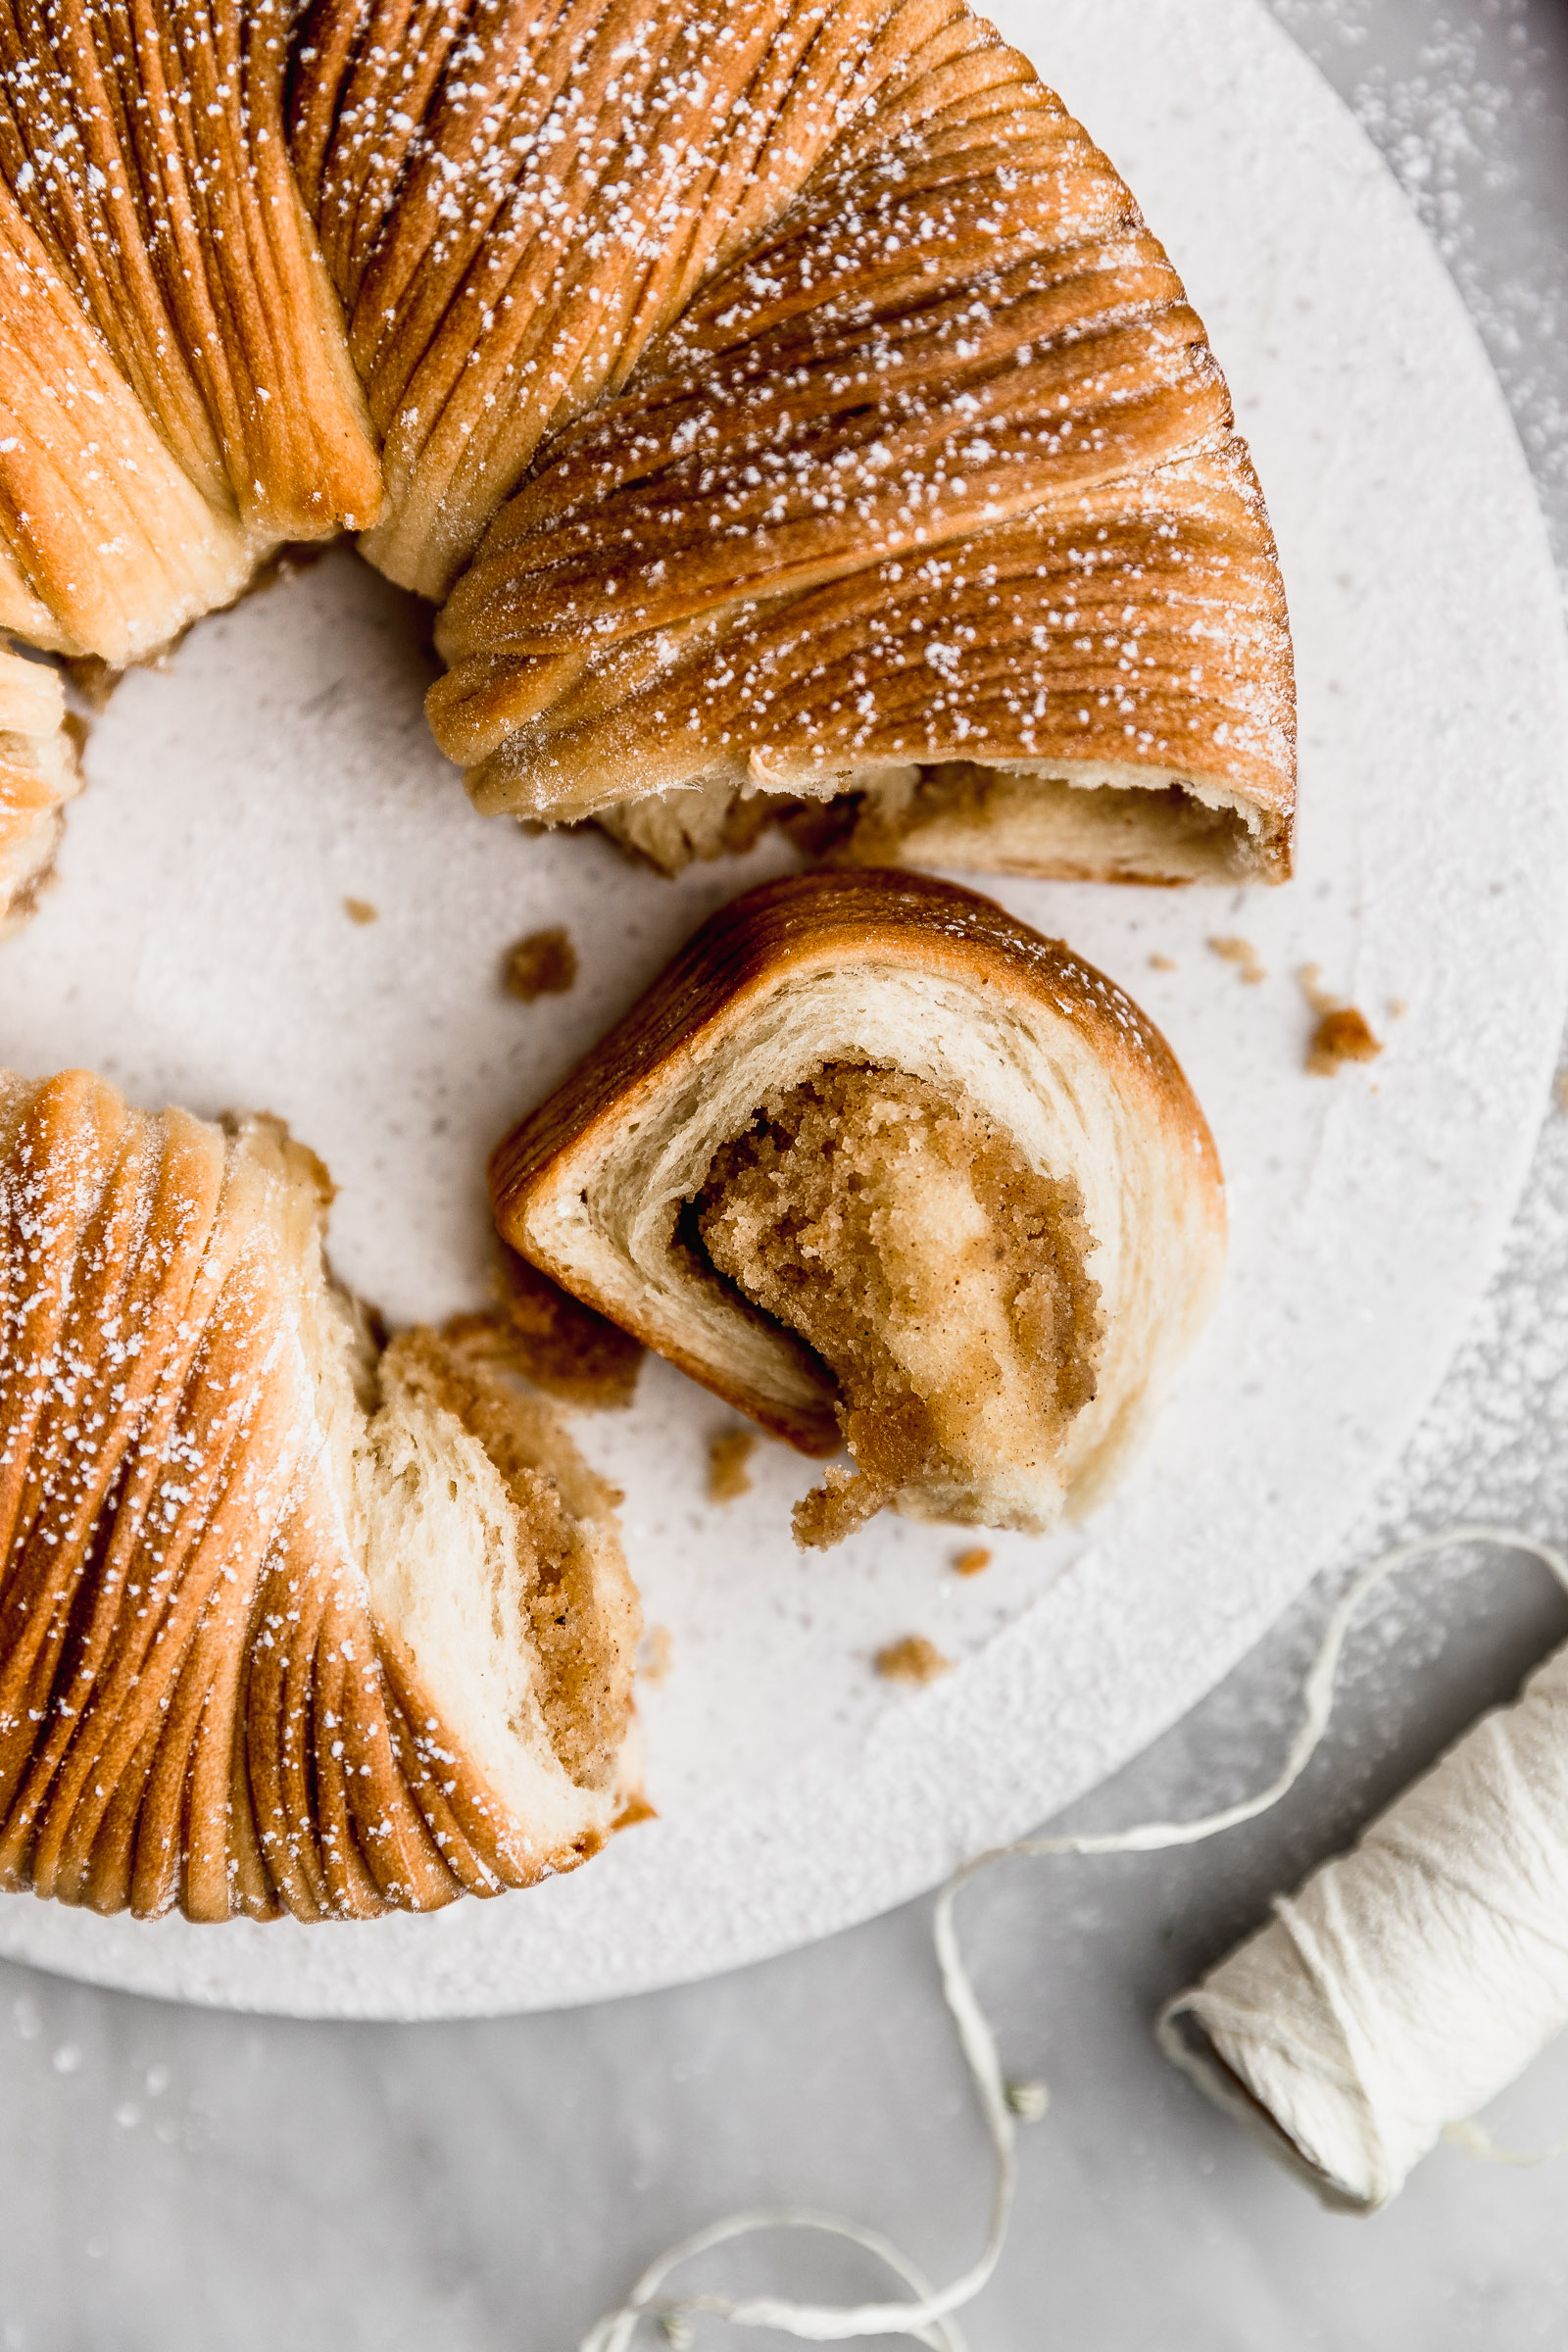
The taste of this wool roll bread is outstanding. When I made I was ultra-focused on the look at first. I love how it looks. However, after I made it… OMG, it’s so good. It’s delicious and the texture of the crumb is perfect. I know you’re going to love it. To make this beautiful bread you can use a stand mixer to knead it or you can also do it by hand.
If you’re using a stand mixer, use the dough hook attachment on medium speed both to knead the dough and then include the butter. Another piece of equipment you will need is a springform pan which is the easiest to achieve the most perfect result. This is my favourite springform pan. I line it with baking paper or parchment paper at the bottom and on the sides of the pan I rub a bit of neutral oil (I like canola oil).
Tangzhong Method
To make this wool roll bread I used an Asian technique called Tangzhong. Please don’t get scared because it’s VERY easy. All you need to do is to cook a bit of milk and flour until a paste forms, like a bechamel sauce of sorts. Except it’s not a sauce it’s rather thick. Then, you reserve it and add it to the bread dough. This simple extra step has a gigantic effect on the texture of the crumb in the bread. When you pull it, it strings out and is extra fluffy. It also increases the amount of time that this wool bread will stay fresh.
The filling
The filling for this wool roll bread is an almond paste or frangipane. It tastes delicious and definitely does not need almond extract because it has the natural flavour of almonds :). I also added spices to give them a Christmas touch. Other options for wool roll bread fillings include nut pastes, chocolate and even a cinnamon roll-type filling. Here are the ingredients you will need for my version of the filling:
- Unsalted butter at room temperature: the butter will bring all the ingredients together and make it extra delicious. It will also prevent the filling from drying out in the cooking process.
- Icing sugar: This will bring sweetness to the recipe for the filling.
- Egg: The egg will make the filling firm up as it bakes so that it doesn’t just spread out of the wool roll bread.
- Salt: Salt is always needed to balance out the sweetness.
- Almond flour: Almond flour has a lovely texture and taste. You can also substitute it with other nut flours depending on your taste.
- All-purpose flour: We need a bit of wheat flour to strengthen the structure of the filling so that it doesn’t leak as it bakes.
- Vanilla extract: This will add a nice touch of vanilla to the filling.
- Spices: I used a mix of ground cinnamon, ground cloves, ground ginger and ground nutmeg for the filling. You can choose to switch these for others you like or skip them altogether.
Ingredients for the wool roll bread recipe
To make this wool roll bread, the procedure is very similar to any type of bread. The most different part is the tangzhong which we talked about before. Other than that, the ingredients are pretty common:
- All-purpose flour: The flour is the ingredient that gives the bread structure and helps bind everything together. For soft bread like this wool roll bread, there’s no need to use bread flour.
- Sugar: This is a sweet bread so there is a bit of sugar in the recipe. I used granulated sugar but you can also use brown sugar if you prefer.
- Instant yeast: I love to use instant yeast in bread recipes because it keeps well in a pantry and it doesn’t need to be activated before using it like active dry yeast does.
- Salt: Salt adds flavour to the dough and makes it really nice to eat.
- Egg: This is an enriched dough, which means we add fat. In this case, it’s in the form of an egg and also milk.
- Warm milk: The milk will add more fat to the dough and also make it extra soft. The texture is reminiscent of Japanese milk bread.
- Unsalted butter: to make it extra rich and delicious, we add room-temperature butter at the end of the process.

Summary of steps to make the recipe
In the recipe card below you will have a detailed description of the method along with step-by-step photos to achieve the best wool roll bread. However, if you want to know what you’re getting yourself into, check out this quick method summary:
- Tangzhong: First, you will make the tangzhong by cooking milk and flour over medium heat in a small saucepan until it thickens. You will let it cool down before adding it to the dough.
- The dough: Bring together all the ingredients except the butter to form a dough. Knead it by hand or using a stand mixer and the dough hook attachment until it’s even, about 10 minutes.
- Adding the butter: Add the butter a little at a time and knead it in. It will look messy at first and you will feel like it’s not coming together at first, but eventually, it does. It also gets easier as you add more butter. Knead until a smooth dough forms.
- Proofing: Form a dough ball, place it in a bowl and cover it with a lid or plastic wrap/cling wrap. Place it in a warm place to proof for 2 hours or until it has doubled in size.
- Making the filling: As the dough rises, make the filling by whisking together all the ingredients for the frangipane in a small bowl.
- Shaping buns: Divide the dough into 6 equal portions. Shape them into buns.
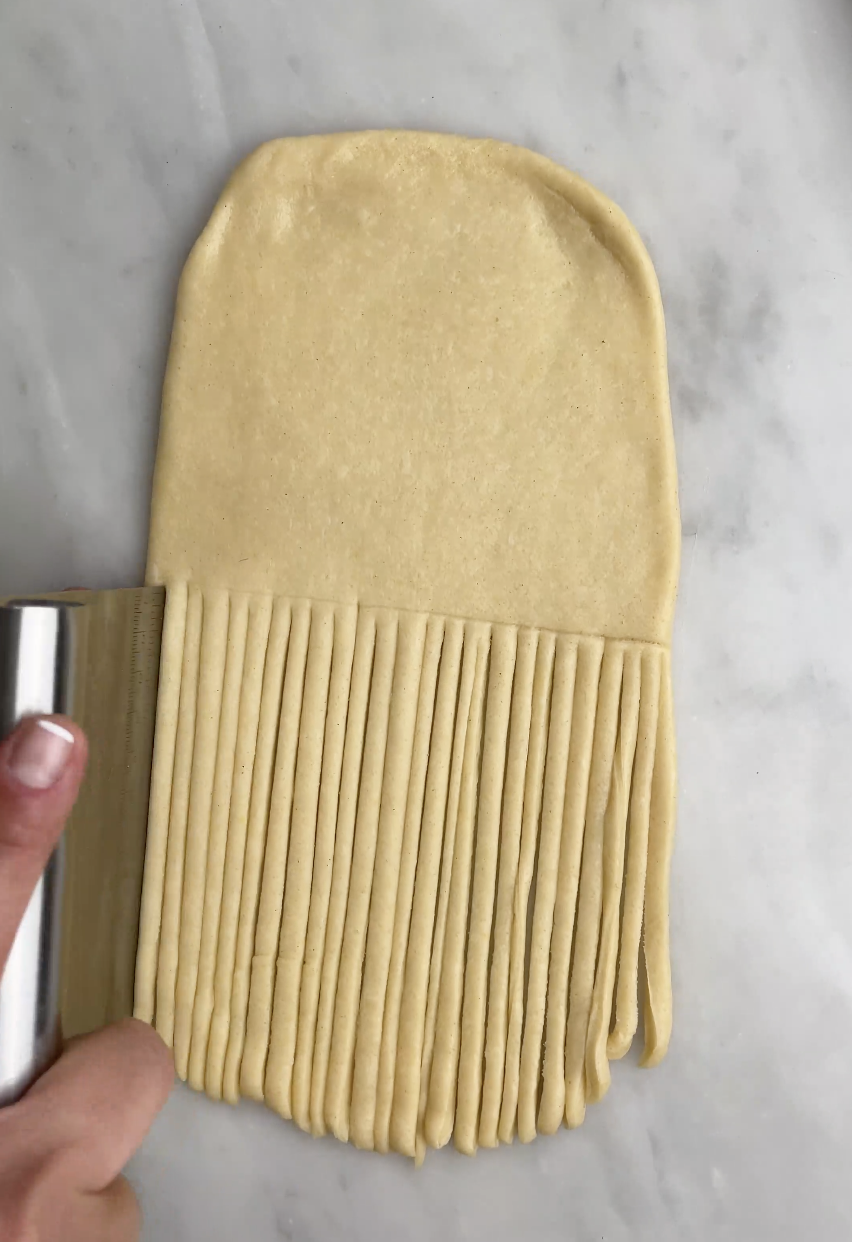
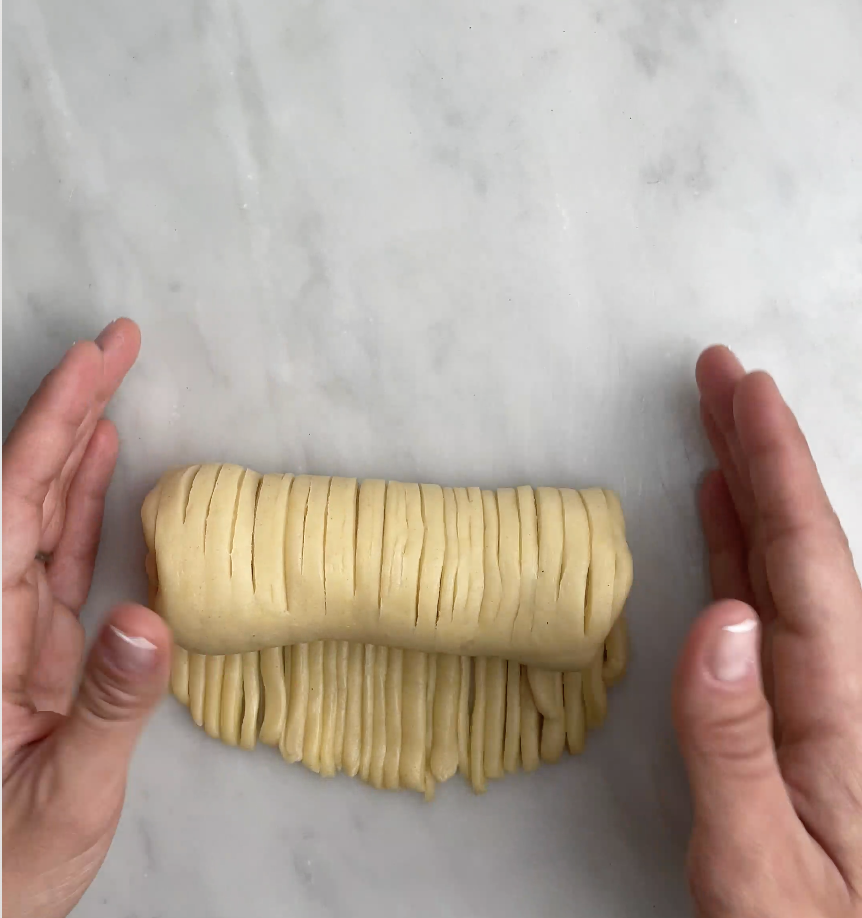
- Rolling out: Roll out one piece of dough at a time only in one way. Do this on a lightly floured surface. You should have an oblong shape. Use a dough scraper to mark the halfway point between the top and bottom of the shape, without cutting through. Use the same scraper or a knife to cut thin strips all along the bottom. Mine were 2mm thick.
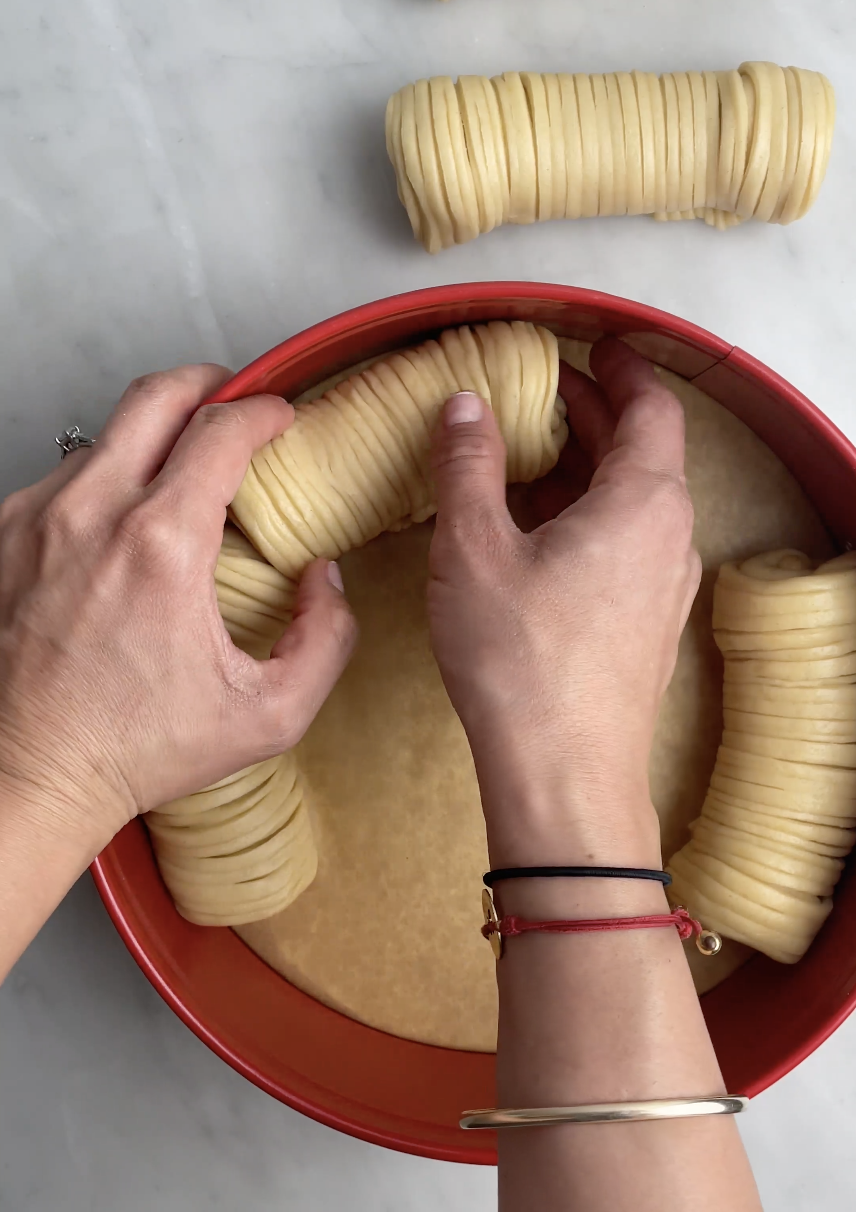
- Filling: Spread one-sixth of the filling on the top part without the strips. Fold a bit of the sides towards the centre and then roll the piece from the top. Repeat this with all the dough pieces. Place them all in the prepared round pan, squeezing them to fit the rest.
- Proofing: Let this proof once again for 1 hour.
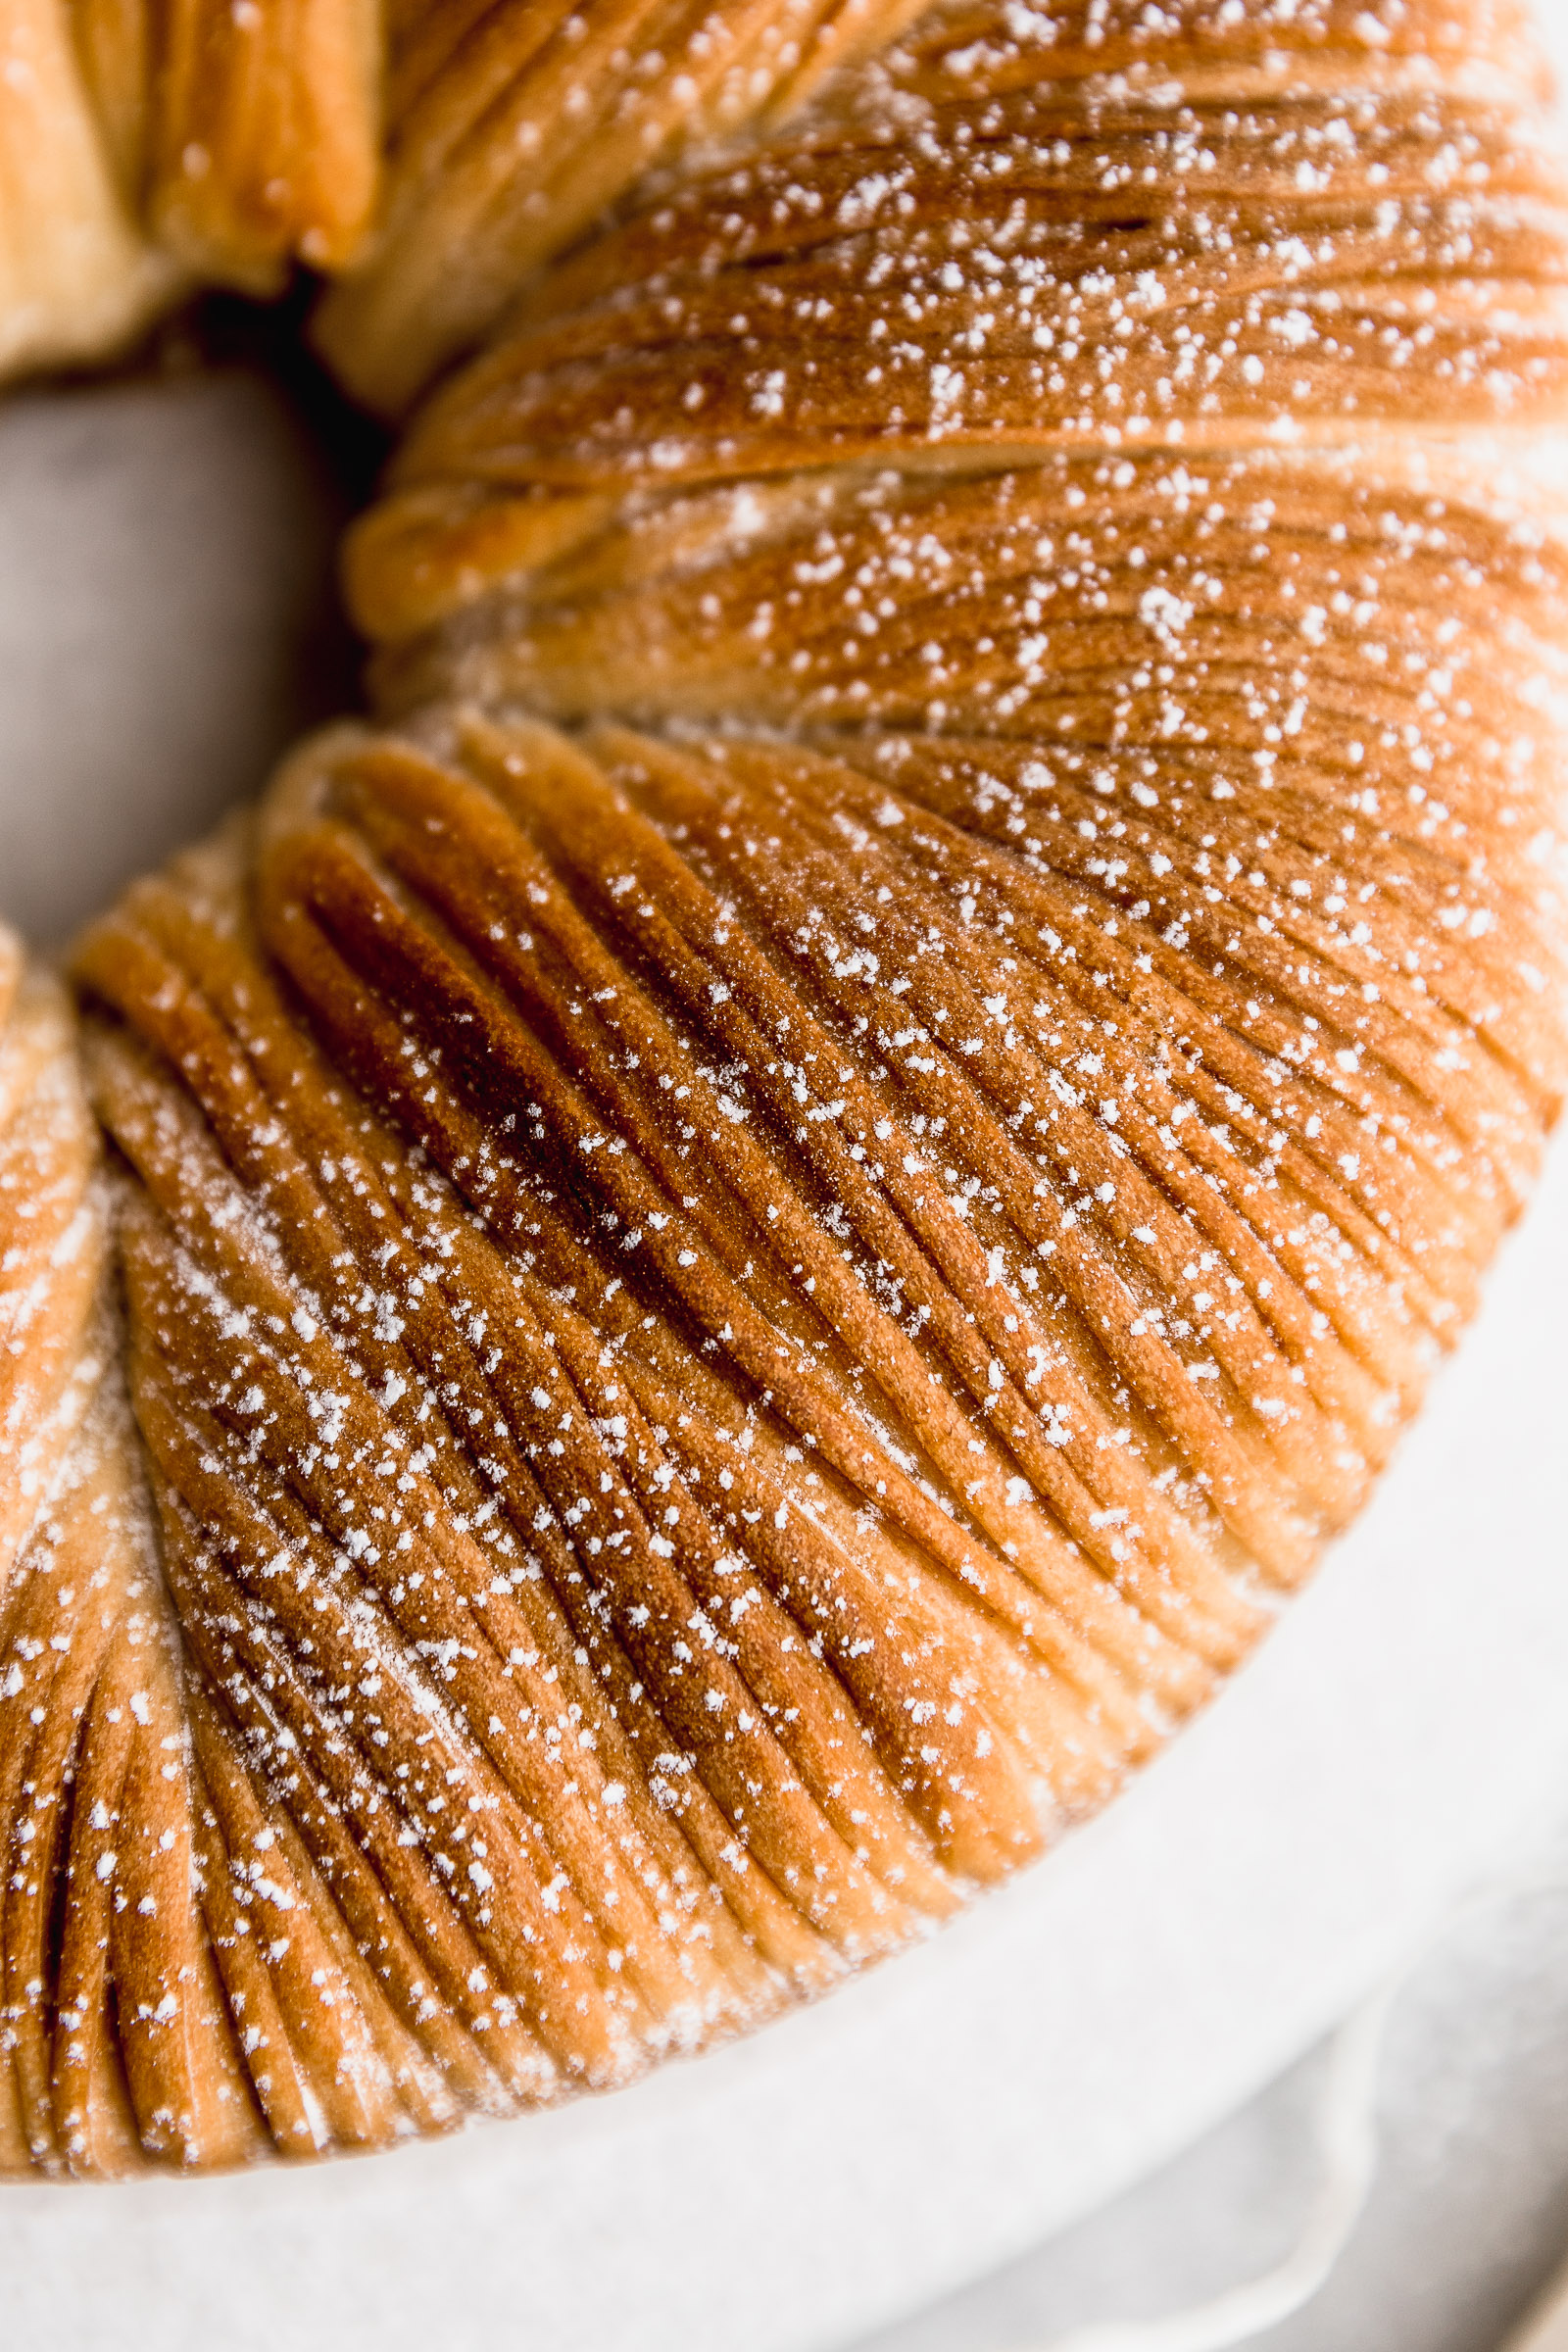
- Baking: Once ready, you will bake the wool roll bread for 30-40 minutes in a preheated oven or until it’s golden brown. Once cold I like to dust it with icing sugar.
Tips for making this wool roll bread
If you’re like me, you want all the tips you can get before embarking on a project like this. Don’t worry because here I am for you! You will make the most amazing wool roll bread with these tips:
- Use a kitchen scale: When making bread the best is always to use a kitchen scale. It’s the most precise way to follow a recipe and in a finicky recipe like this one, it’s really important. I also used the scale to divide the dough. I weigh the total amount my dough weighs, divide that by 6 and use that number to make a perfect portioning of the dough for an even wool roll bread.
- Make thin strips: For this bread to look like a roll of wood you need to make thin strips when cutting the dough. Thicker ones also look nice but you get the full illusion with thin strips. Mine were 2mm thick.
- Let the tangzhong cool down before adding it to the dough. You don’t want to risk killing the yeast by adding it while it’s hot.
- Use warm milk, not hot! Just like with the tangzhong, if your milk is too hot it could kill the yeast. Also, it could cook the egg!
Woll Roll Bread with Almond Filling (Frangipane)
Ingredients
For the tangzhong
- 30 g all-purpose flour
- 120 ml milk
For the bread dough
- 390 g all-purpose flour
- 65 g sugar
- 8 g instant yeast
- 1½ tsp salt
- 1 egg
- 120 ml/g warm milk
- tangzhong from above
- 110 g unsalted butter at room temperature
For the filling
- 70 g unsalted butter at room temperature
- 90 g icing sugar
- 1 egg
- ¼ tsp salt
- 100 g almond flour whole or peeled
- 30 g all-purpose flour
- 1 tsp vanilla extract
- 1 tsp cinnamon optional
- ¼ tsp ground clove optional
- ½ tsp ground ginger optional
- ¼ tsp ground nutmeg optional
Instructions
For the tangzhong
- In a small pot or saucepan, mix the ingredients until they look homogeneous.
- Place the pot over medium heat and let it cook while stirring all the time until it thickens completely. It will look like a VERY thick bechamel sauce.
- Remove the tangzhong from the pot and place it in a bowl. Let it cool down completely before using it in the recipe.
For the bread dough
- Place all the ingredients except the butter in a bowl and start mixing first with a spatula and then with your hands when the spatula doesn't help anymore. Knead for 20 minutes by hand.If you're using a stand mixer like me, place all the ingredients except the butter in the bowl and mix them in slightly using the hook. Then knead on medium speed for 10 minutes.
- Add the butter a little at a time and knead to incorporate it. You can do this by hand or in a stand mixer with the hook attachment. At first, it will be messy and look like it has gone wrong, but as you knead it will come together. Stop kneading once you have a homoegenous and shiny dough.
- Place the dough in a bowl, cover it and let it proof in a warm spot for 2 hours or until it doubles in size. I like to place it in the oven with the light on.
For the filling
- In the same bowl where you had the dough (no need to wash) place all the filling's ingredients and whisk them together or use a stand mixer.
For the assembly
- Once the dough has proofed, weigh it and divide it into 6 equal portions. Flatten each one and then fold the edges towards the centre to form a parcel. Flip it around and make it spin, pushing it down slightly against the surface to close the place where the dough meets at the back.
- Go back to the first portion you shaped and use a rolling pin to flatten it, but only do it lengthwise.
- With a knife or dough scraper, make a mark at the middle of the dough, dividing the top from the bottom without actually cutting it.
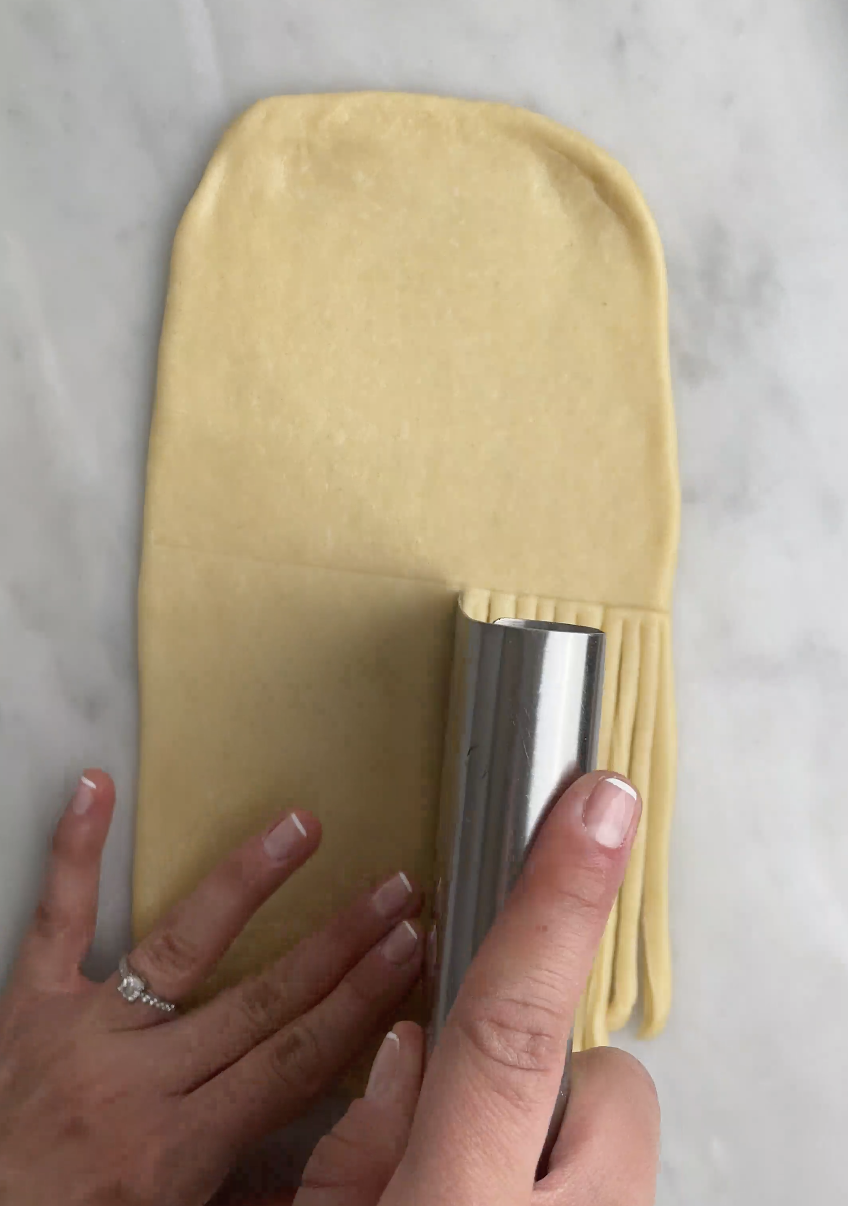
- On the bottom half make several cuts, close to each other to make strings.
- Spread around 1/6th of the filling on the half that has no strings. Fold the edges in to contain the filling.
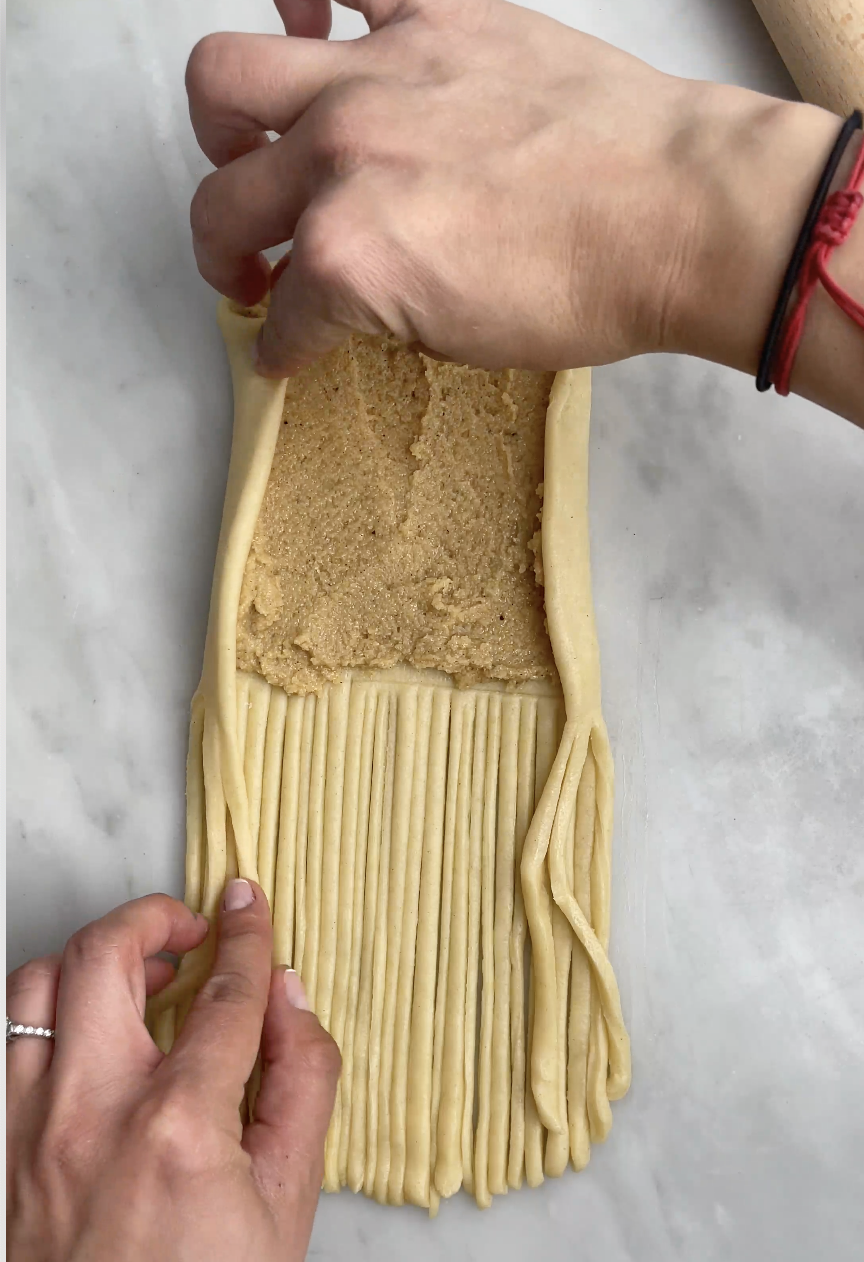
- Roll the portion of dough starting from the half with filling and finishing with the half with the strings. Repeat these steps with all the portions.
- Place the rolls in a 25cm/10 inches round pan. If it's not non-stick, line it first with baking paper at the bottom and grease the sides. Start by placing two rolls on either side of the pan and then the rest in between these two so that it's symmetrical. You'll have to squeeze them a bit to fit them all in. IMPORTANT: make sure that the part where the strings finish goes under and against the back of the pan. It's because it unravels a bit as it bakes and you don't want the filling to come pouring out.
- Let the bread proof for 1 hour in a warm spot or until it doubles in size.
- Bake in a preheated oven at 180°C/350°F for 30-40 minutes or until golden.
7 comments
Hi.
Greetings!!
Is it possible to send/ post a video how to knead the bread….a visual will be easier.
Thanks
Hi! you can see it here: https://youtu.be/PEMvbiXYSvQ
Is it possible to get the ingredients in cups instead of metric system?
Hi Sharon! Sadly I don’t use cups. They’re too inexact and different around the world. By using weight (you can always transform to ounces or just switch the units in your scale) for exact measurements.
Do you add the tangzhong to the bread or the filling? And do you have any pics of how to make the wool look?
Hi! I add it to the dough 🙂 I’ve now added steph by step photos for the assembly 🙂
Love the recipe! I also use weighted metric measurements. Something that might be helpful to add would be the dimensions of the dough once rolled out. I tried to judge by the photos, but knowing how many inches/centimeters the dough rectangle should be each time would have helped me to make my loaf more uniform. Thank you for a wonderful tutorial and especially for the great filling idea!